引言
之前博客对DUSt3R系列及其对应的dymanic 4D pointmap都做了深入的介绍以及复现。本博文记录本人复现及测试Easi3R: Estimating Disentangled Motion from DUSt3R Without Training的笔记。
本博文仅供本人学习记录用~
相关的资料:
- paper
- Github
- website
- 本博客采用的代码及注释(如有)均在My Github Link
- Survey for Transformer-based SLAM:Paper List and Blog
- 博客:What is Transformer? Form NLP to CV
理论解读
该工作号称是A simple training-free approach adapting DUSt3R for dynamic scenes也就是不需要重新训练即可将DUSt3R应用于dynamic 场景.
DUSt3R是针对静态场景的,而当然,用动态场景的数据集(4D数据)重新训练DUSt3R,但是4D数据是有限的,很难保证训练模型的泛化能力。 也可以基于DUSt3R的预训练权重+光流、语义、深度等等的网络来训练一个4D模型,但是这又会大大增加复杂度(比如之前博客介绍的MonST3R)。 而本文则是通过对推理阶段的attention的调整来实现将DUSt3R直接用到dynamic场景中,避免了预训练或者fine-tune.
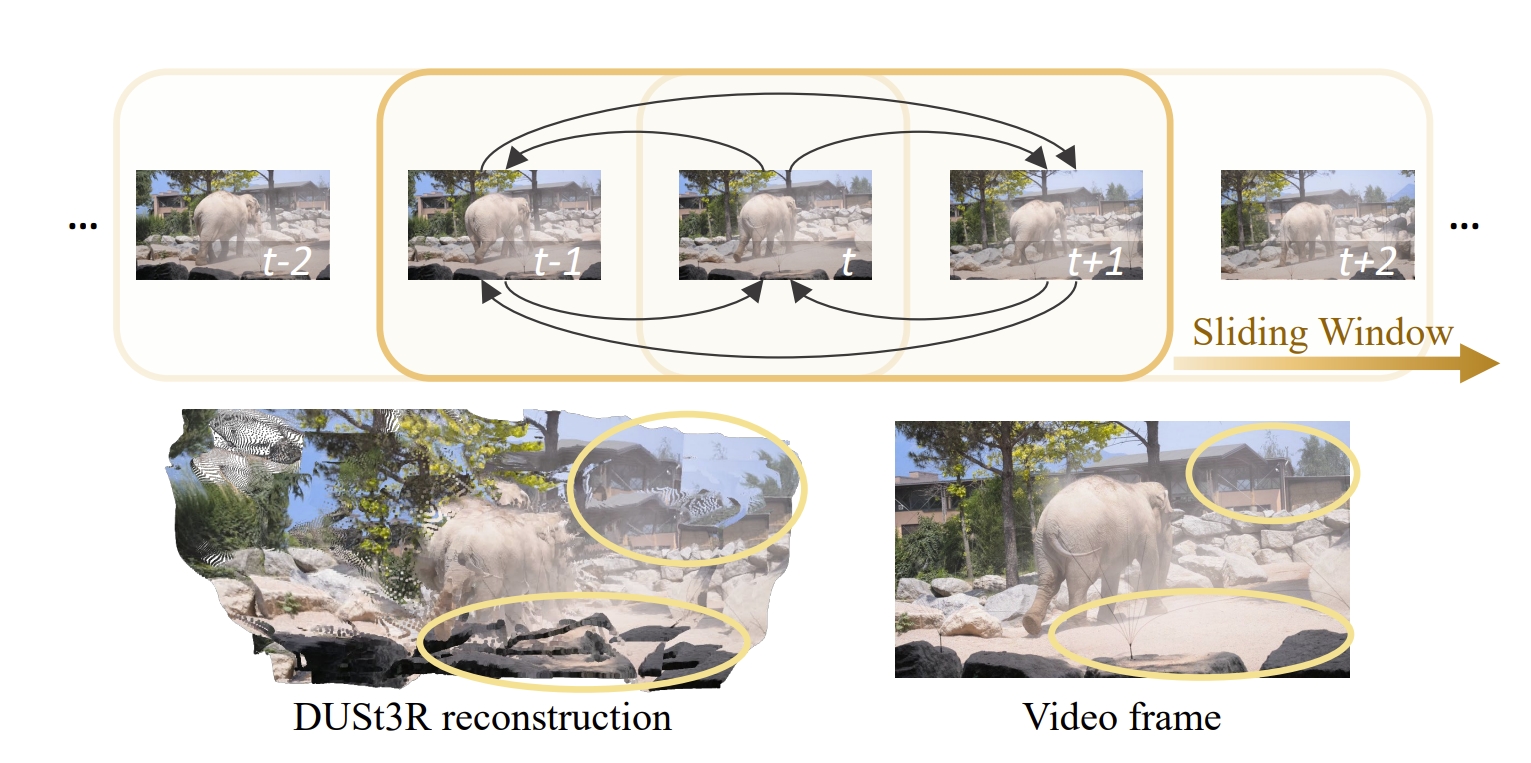
作者发现,通过DUSt3R学习的隐含相似性机制,可以实现动态物体的分割、稠密pointmap的重建以及dynamic video的pose estimation.当然,如下图所示,传统的DUSt3R在动态场景下是会失真的。但是通过对其分析发现:小纹理区域、遮挡区域以及动态物体区域的attention值都比较小,那么就可以很简单的将attention值较小的区域分割开来来实现动态物体的识别与分割。
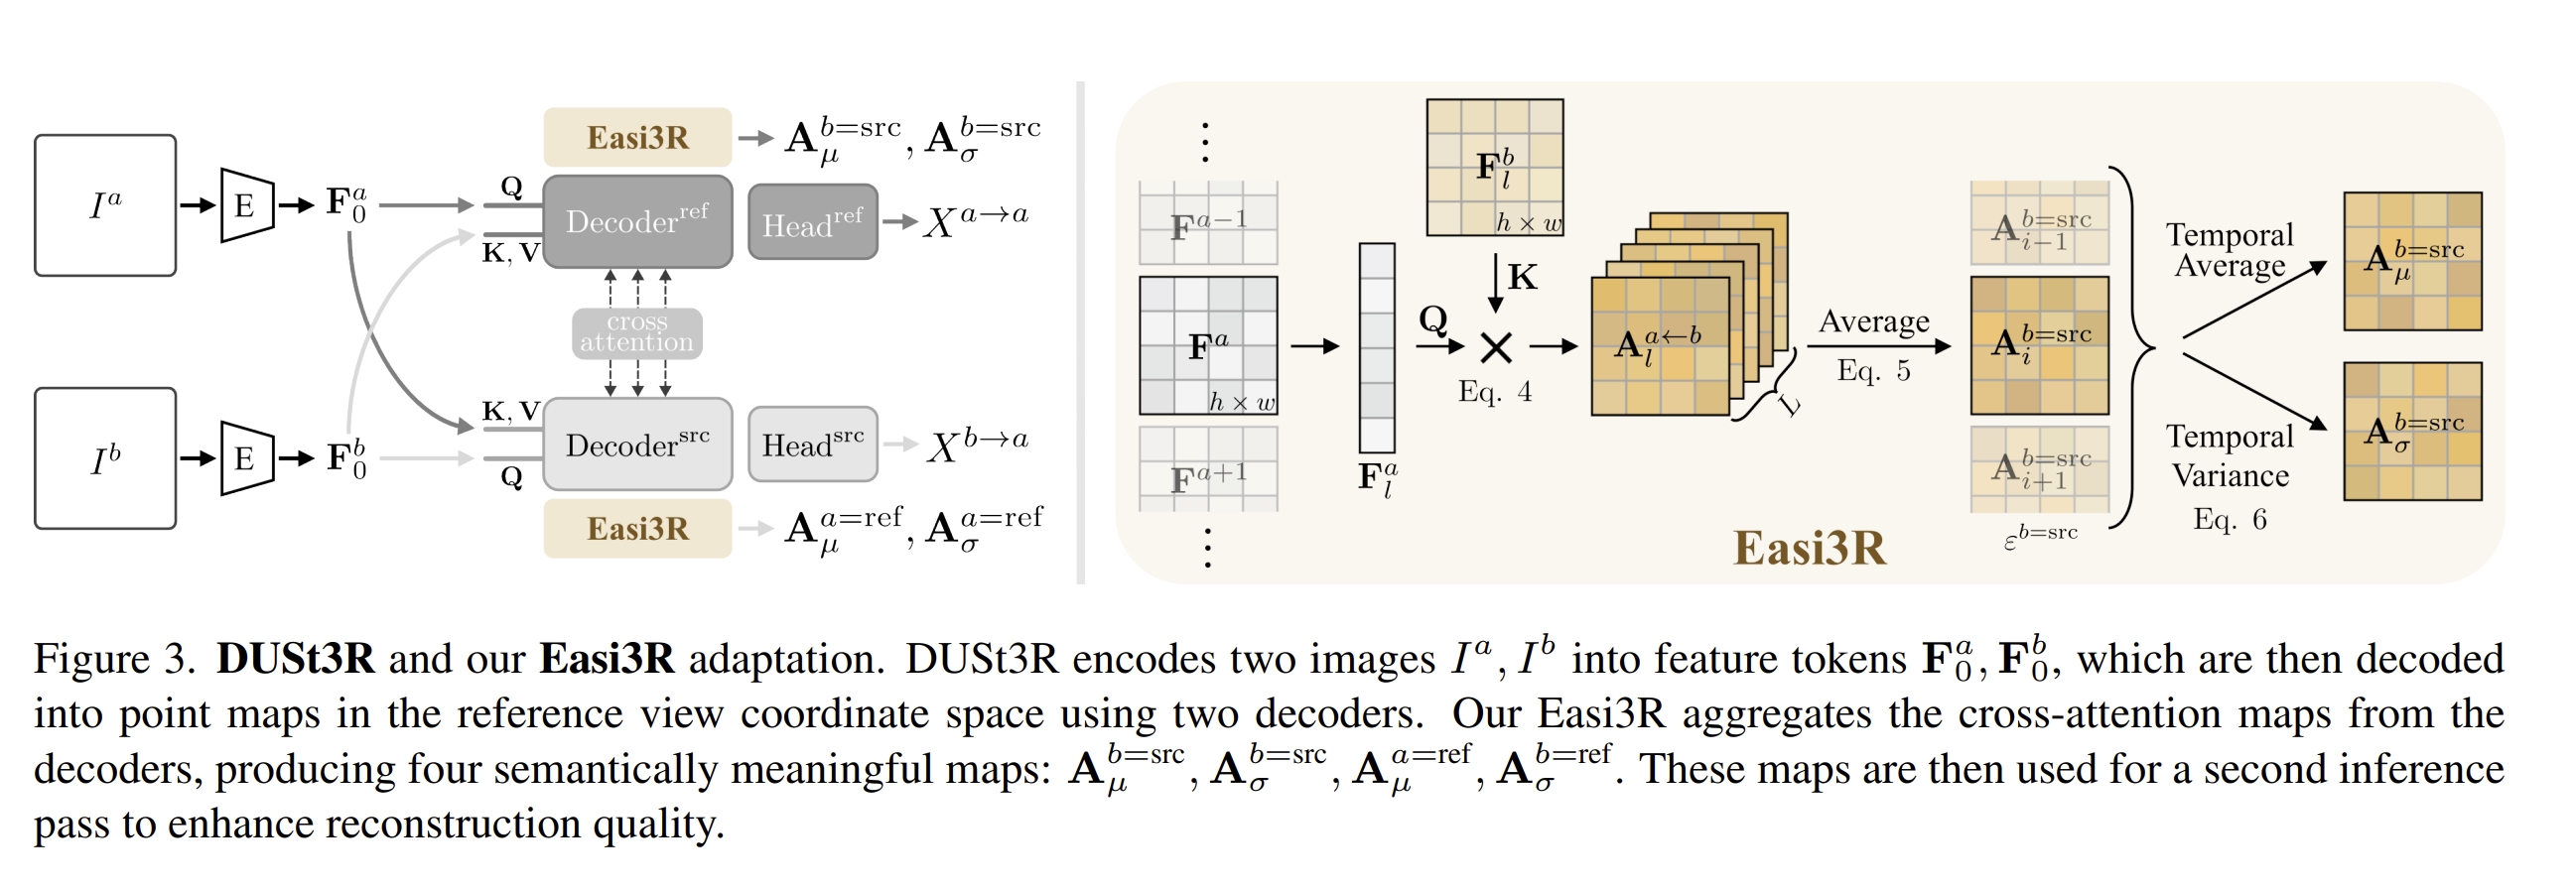
而基于上述的动态物体分割,再通过在cross-attention layer中引入re-weighting那么就能够实现鲁棒的动态4D重建和相机运动恢复,并且无需动态数据集或者对网络进行fine-tune。
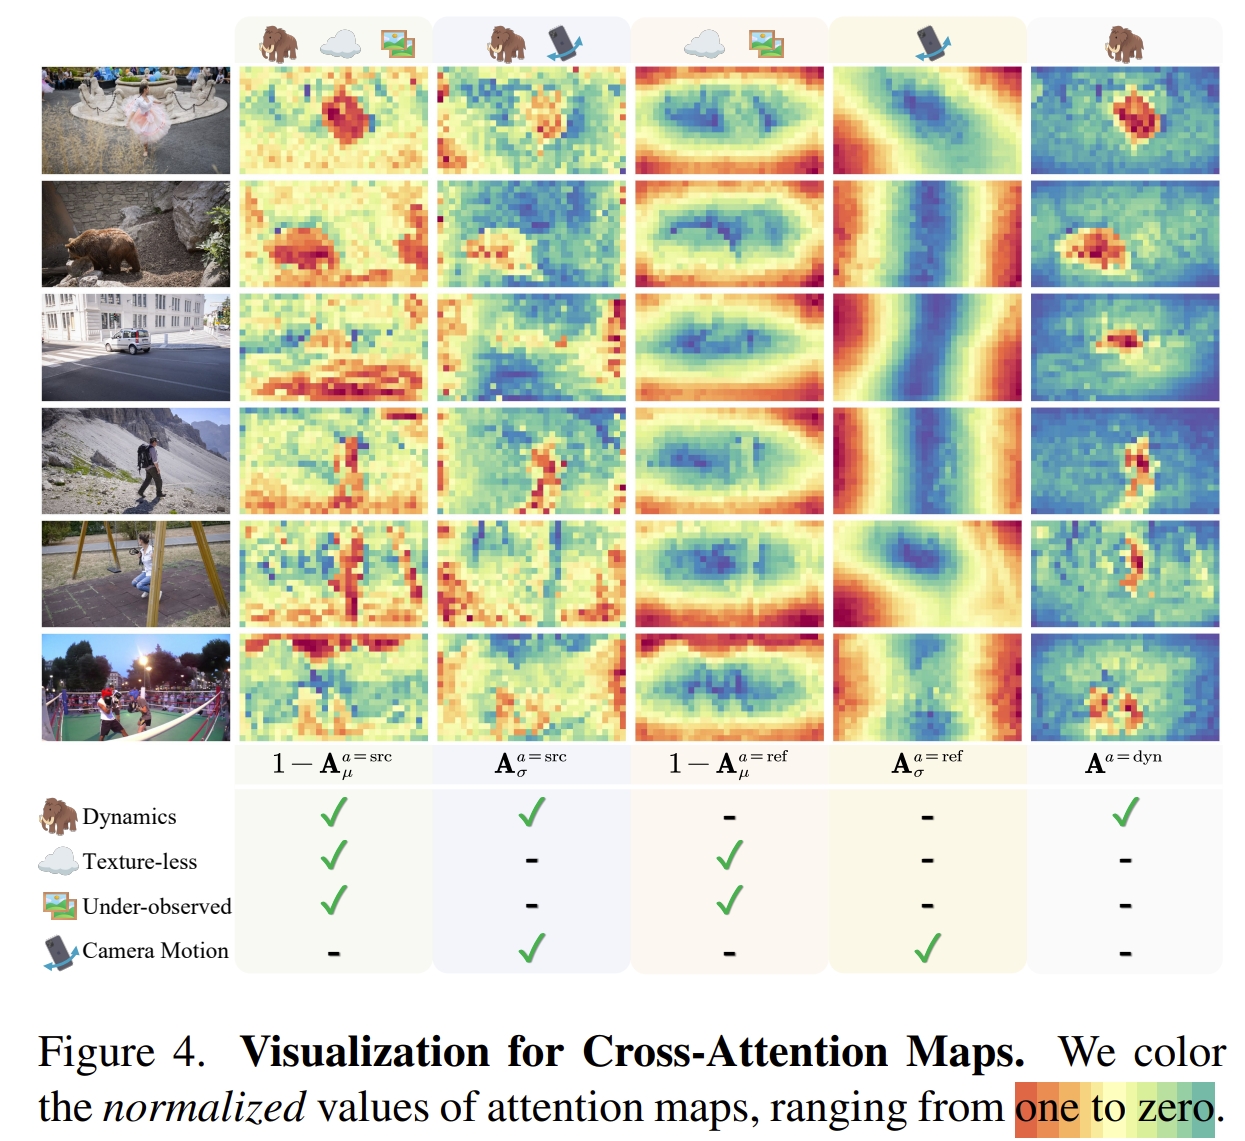
下面可视化了Dynamic Attention相对于静态区域的区别
那么基于Attention值的不一致性可以较好的把动态物体分割出来
下面对比一下相同场景下Spatial and Temporal Attention以及Cross-frame Feature Clustering
更多可视化请见论文的网页。
实验复现
配置
git clone https://github.com/KwanWaiPang/Easi3R.git

# rm -rf .git
conda create -n easi3r python=3.10 cmake=3.31
conda activate easi3r
# conda remove --name easi3r --all

conda install pytorch torchvision pytorch-cuda=12.1 -c pytorch -c nvidia  # use the correct version of cuda for your system
pip install -r requirements.txt

# install 4d visualization tool
pip install -e viser

# install SAM2
pip install -e third_party/sam2 --verbose

# compile the cuda kernels for RoPE (as in CroCo v2).
# DUST3R relies on RoPE positional embeddings for which you can compile some cuda kernels for faster runtime.
cd croco/models/curope/
python setup.py build_ext --inplace
cd ../../../
然后下载权重文件,包括了DUSt3R, MonST3R, RAFT 以及 SAM2四个模型的权重(后面3个应该是monst3r需要用到作对比的)
# download the weights
cd data
bash download_ckpt.sh
cd ..
测试
通过运行下面代码来执行交互demo(用vscode运行点击网页即可打开交互界面),结果会存放在demo_tmp/{Sequence Name}中
cd Easi3R/
conda activate easi3r
OPENBLAS_NUM_THREADS=1 CUDA_VISIBLE_DEVICES=0 python demo.py \
    --weights checkpoints/DUSt3R_ViTLarge_BaseDecoder_512_dpt.pth

# To change backbone(改为用monst3r对比), --weights checkpoints/MonST3R_PO-TA-S-W_ViTLarge_BaseDecoder_512_dpt.pth

- 也可以采用下面的没有交互界面的模式:
OPENBLAS_NUM_THREADS=1 CUDA_VISIBLE_DEVICES=0 python demo.py --input demo_data/dog-gooses \
    --output_dir demo_tmp --seq_name dog-gooses \
    --weights checkpoints/DUSt3R_ViTLarge_BaseDecoder_512_dpt.pth

# To change backbone, --weights checkpoints/MonST3R_PO-TA-S-W_ViTLarge_BaseDecoder_512_dpt.pth
# To use SAM2, add: --sam2_mask_refine
# use video as input: --input demo_data/dog-gooses.mp4
# reduce the memory cost: set maximum number of frames used from video --num_frames 65
# faster video option: down sample the video fps to --fps 5
- 而可视化交互的4D结果可通过运行下面代码:
python viser/visualizer.py --data demo_tmp/dog-gooses --port 9081
- 对于其他数据集下载,可运行下面代码。不过之前已经下载好在目录
/home/gwp/monst3r/data/davis_videos下了,因此直接调用即可~
cd data; python download_prepare_davis.py; cd ..

#测试lady-running
OPENBLAS_NUM_THREADS=1 CUDA_VISIBLE_DEVICES=0 python demo.py --input /home/gwp/monst3r/demo_data/lady-running.mp4 \
    --output_dir demo_tmp --seq_name lady-running \
    --weights checkpoints/DUSt3R_ViTLarge_BaseDecoder_512_dpt.pth

#测试breakdance
OPENBLAS_NUM_THREADS=1 CUDA_VISIBLE_DEVICES=0 python demo.py --input /home/gwp/monst3r/data/davis_videos/breakdance.mp4 \
    --output_dir demo_tmp --seq_name breakdance \
    --weights checkpoints/DUSt3R_ViTLarge_BaseDecoder_512_dpt.pth

#测试judo
OPENBLAS_NUM_THREADS=1 CUDA_VISIBLE_DEVICES=0 python demo.py --input /home/gwp/monst3r/data/davis_videos/judo.mp4 \
    --output_dir demo_tmp --seq_name judo \
    --weights checkpoints/DUSt3R_ViTLarge_BaseDecoder_512_dpt.pth
生成的动态depth map如下图所示
 dog-gooses
|
 lady-running
|
 breakdance
|
 judo
judo
|
对应的4D pointmap可视化如下:
- dog-gooses, 点击打开更清晰:
- lady-running, 点击打开更清晰:
- breakdance, 点击打开更清晰: <!– <div id="wrapper" style=" display: flex; flex-wrap: wrap; justify-content: center; align-items: center; gap: 2em; ">
</div> –>
- judo, 点击打开更清晰: <!– <div id="wrapper" style=" display: flex; flex-wrap: wrap; justify-content: center; align-items: center; gap: 2em; ">
</div> –>
对于实验效果,从网站上看感觉比MonST3R是好不少的,但是这里测试的几个之前MonST3R测试过的序列却感觉提升没有很明显。