- 本博文复现过程采用的代码及代码注释(如有):My github repository
- 原github:Link
实验配置
- 环境配置
# rm -rf .git
git clone https://github.com/R-C-Group/MASt3R-Fusion-comment.git --recursive

conda create -n mast3r_fusion python=3.11.9
conda activate mast3r_fusion
# conda remove --name mast3r_fusion --all
pip install torch==2.5.1 torchvision==0.20.1 torchaudio==2.5.1 --index-url https://download.pytorch.org/whl/cu124
pip install opencv-python==4.10.0.84 opencv-contrib-python==4.10.0.84
pip install h5py pyparsing
- 安装GTSAM,这是作者修改版本的,包含了边缘化以及Sim(3)视觉约束
conda activate mast3r_fusion

# git clone https://github.com/yuxuanzhou97/gtsam.git
git clone git@github.com:yuxuanzhou97/gtsam.git
cd gtsam
# cd .. && rm -rf build/
mkdir build && cd build
cmake .. -DGTSAM_BUILD_PYTHON=1 -DGTSAM_PYTHON_VERSION=3.11.9 -DPYTHON_EXECUTABLE=`which python` -Dpybind11_INCLUDE_DIR=$PYBIND11_INCLUDE_DIR
make python-install -j12
- 可能会出现调用
/usr/include/pybind11/等问题,需要安装最新版的pybind11,并精准CMake配置
pip install --upgrade pybind11

cd gtsam
rm -rf build

# 获取详细的 pybind11 信息
PYBIND11_INCLUDE_DIR=$(python -c "import pybind11; print(pybind11.get_include())")
PYBIND11_CMAKE_DIR=$(python -c "import pybind11; import os; print(os.path.join(pybind11.__path__[0], 'share', 'cmake', 'pybind11'))")

echo "Pybind11 include: $PYBIND11_INCLUDE_DIR"
echo "Pybind11 cmake: $PYBIND11_CMAKE_DIR"

mkdir build && cd build
cmake .. \
  -DGTSAM_BUILD_PYTHON=1 \
  -DGTSAM_PYTHON_VERSION=3.11.9 \
  -DPYTHON_EXECUTABLE=$(which python) \
  -Dpybind11_DIR=$PYBIND11_CMAKE_DIR \
  -DCMAKE_PREFIX_PATH=$CONDA_PREFIX \
  -DCMAKE_INCLUDE_PATH=$PYBIND11_INCLUDE_DIR

make python-install -j12

- 工程安装:
cd MASt3R-Fusion/
# pip install -e thirdparty/mast3r
pip install --no-build-isolation -e thirdparty/mast3r

pip install -e thirdparty/in3d
pip install --no-build-isolation -e .
- 对于
pip install --no-build-isolation -e .涉及到lietorch的安装可能出现超时的问题,做出改进如下:
"lietorch @ git+https://github.com/princeton-vl/lietorch.git",
或者替换为:
"lietorch @ git+ssh://git@github.com/princeton-vl/lietorch.git",
- 下载权重文件
mkdir -p checkpoints/
wget https://download.europe.naverlabs.com/ComputerVision/MASt3R/MASt3R_ViTLarge_BaseDecoder_512_catmlpdpt_metric.pth -P checkpoints/
wget https://download.europe.naverlabs.com/ComputerVision/MASt3R/MASt3R_ViTLarge_BaseDecoder_512_catmlpdpt_metric_retrieval_trainingfree.pth -P checkpoints/
wget https://download.europe.naverlabs.com/ComputerVision/MASt3R/MASt3R_ViTLarge_BaseDecoder_512_catmlpdpt_metric_retrieval_codebook.pkl -P checkpoints/
- 下载KITTI-360数据集:
- 首先,需要下载KITTI的
Perspective Images for Train & Val (128G)。运行bash download_2d_perspective_unrectified.sh来下载; - 其次,还需下载预备的IMU及GT数据:Google Drive
- 首先,需要下载KITTI的
- 对于KITTI数据集下载,可能链接不上,采用如下方式:
# 为kitti数据所存放的亚马逊网站指定IP地址
echo '52.219.169.53    s3.eu-central-1.amazonaws.com' | sudo tee -a /etc/hosts
- 若出现报错
start of libtorchcodec loading traceback,系统找不到 libavutil.so.59、libavutil.so.58、libavutil.so.57 等文件。
sudo apt install ffmpeg libavcodec-extra

#检查安装的结果
ffmpeg -version
ldconfig -p | grep libavutil

#注意支持的FFmpeg版本,建议安装6.0
#conda install ffmpeg=6.0 -c conda-forge
运行下面测试:
conda activate mast3r_fusion

bash batch_kitti360_vi.sh # for real-time SLAM

#此外也可以选择下面的全指令方式
python main.py \
        --dataset "${base_dataset_path}/2013_05_28_drive_0000_sync/image_00/data_rgb" \
        --config "config/base_kitti360.yaml" \
        --calib "config/intrinsics_kitti360.yaml" \
        --imu_path "${base_dataset_path}/2013_05_28_drive_0000_sync/imu.txt" \
        --imu_dt -0.04 \ # constant V-I time offset for KITTI-360
        --stamp_path "${base_dataset_path}/2013_05_28_drive_0000_sync/camstamp.txt" \
        --result_path "result.txt" \
        --save_h5 \
        --no-viz # for realtime visualization, comment this line

# real-time SLAM没有回环
python main.py \
        --dataset "${base_dataset_path}/2013_05_28_drive_0000_sync/image_00/data_rgb" \
        --config "config/base_kitti360.yaml" \
        --calib "config/intrinsics_kitti360.yaml" \
        --imu_path "${base_dataset_path}/2013_05_28_drive_0000_sync/imu.txt" \
        --imu_dt -0.04 \ # constant V-I time offset for KITTI-360
        --stamp_path "${base_dataset_path}/2013_05_28_drive_0000_sync/camstamp.txt" \
        --result_path "result.txt" \
        --save_h5 \
        --no-viz # for realtime visualization, comment this line
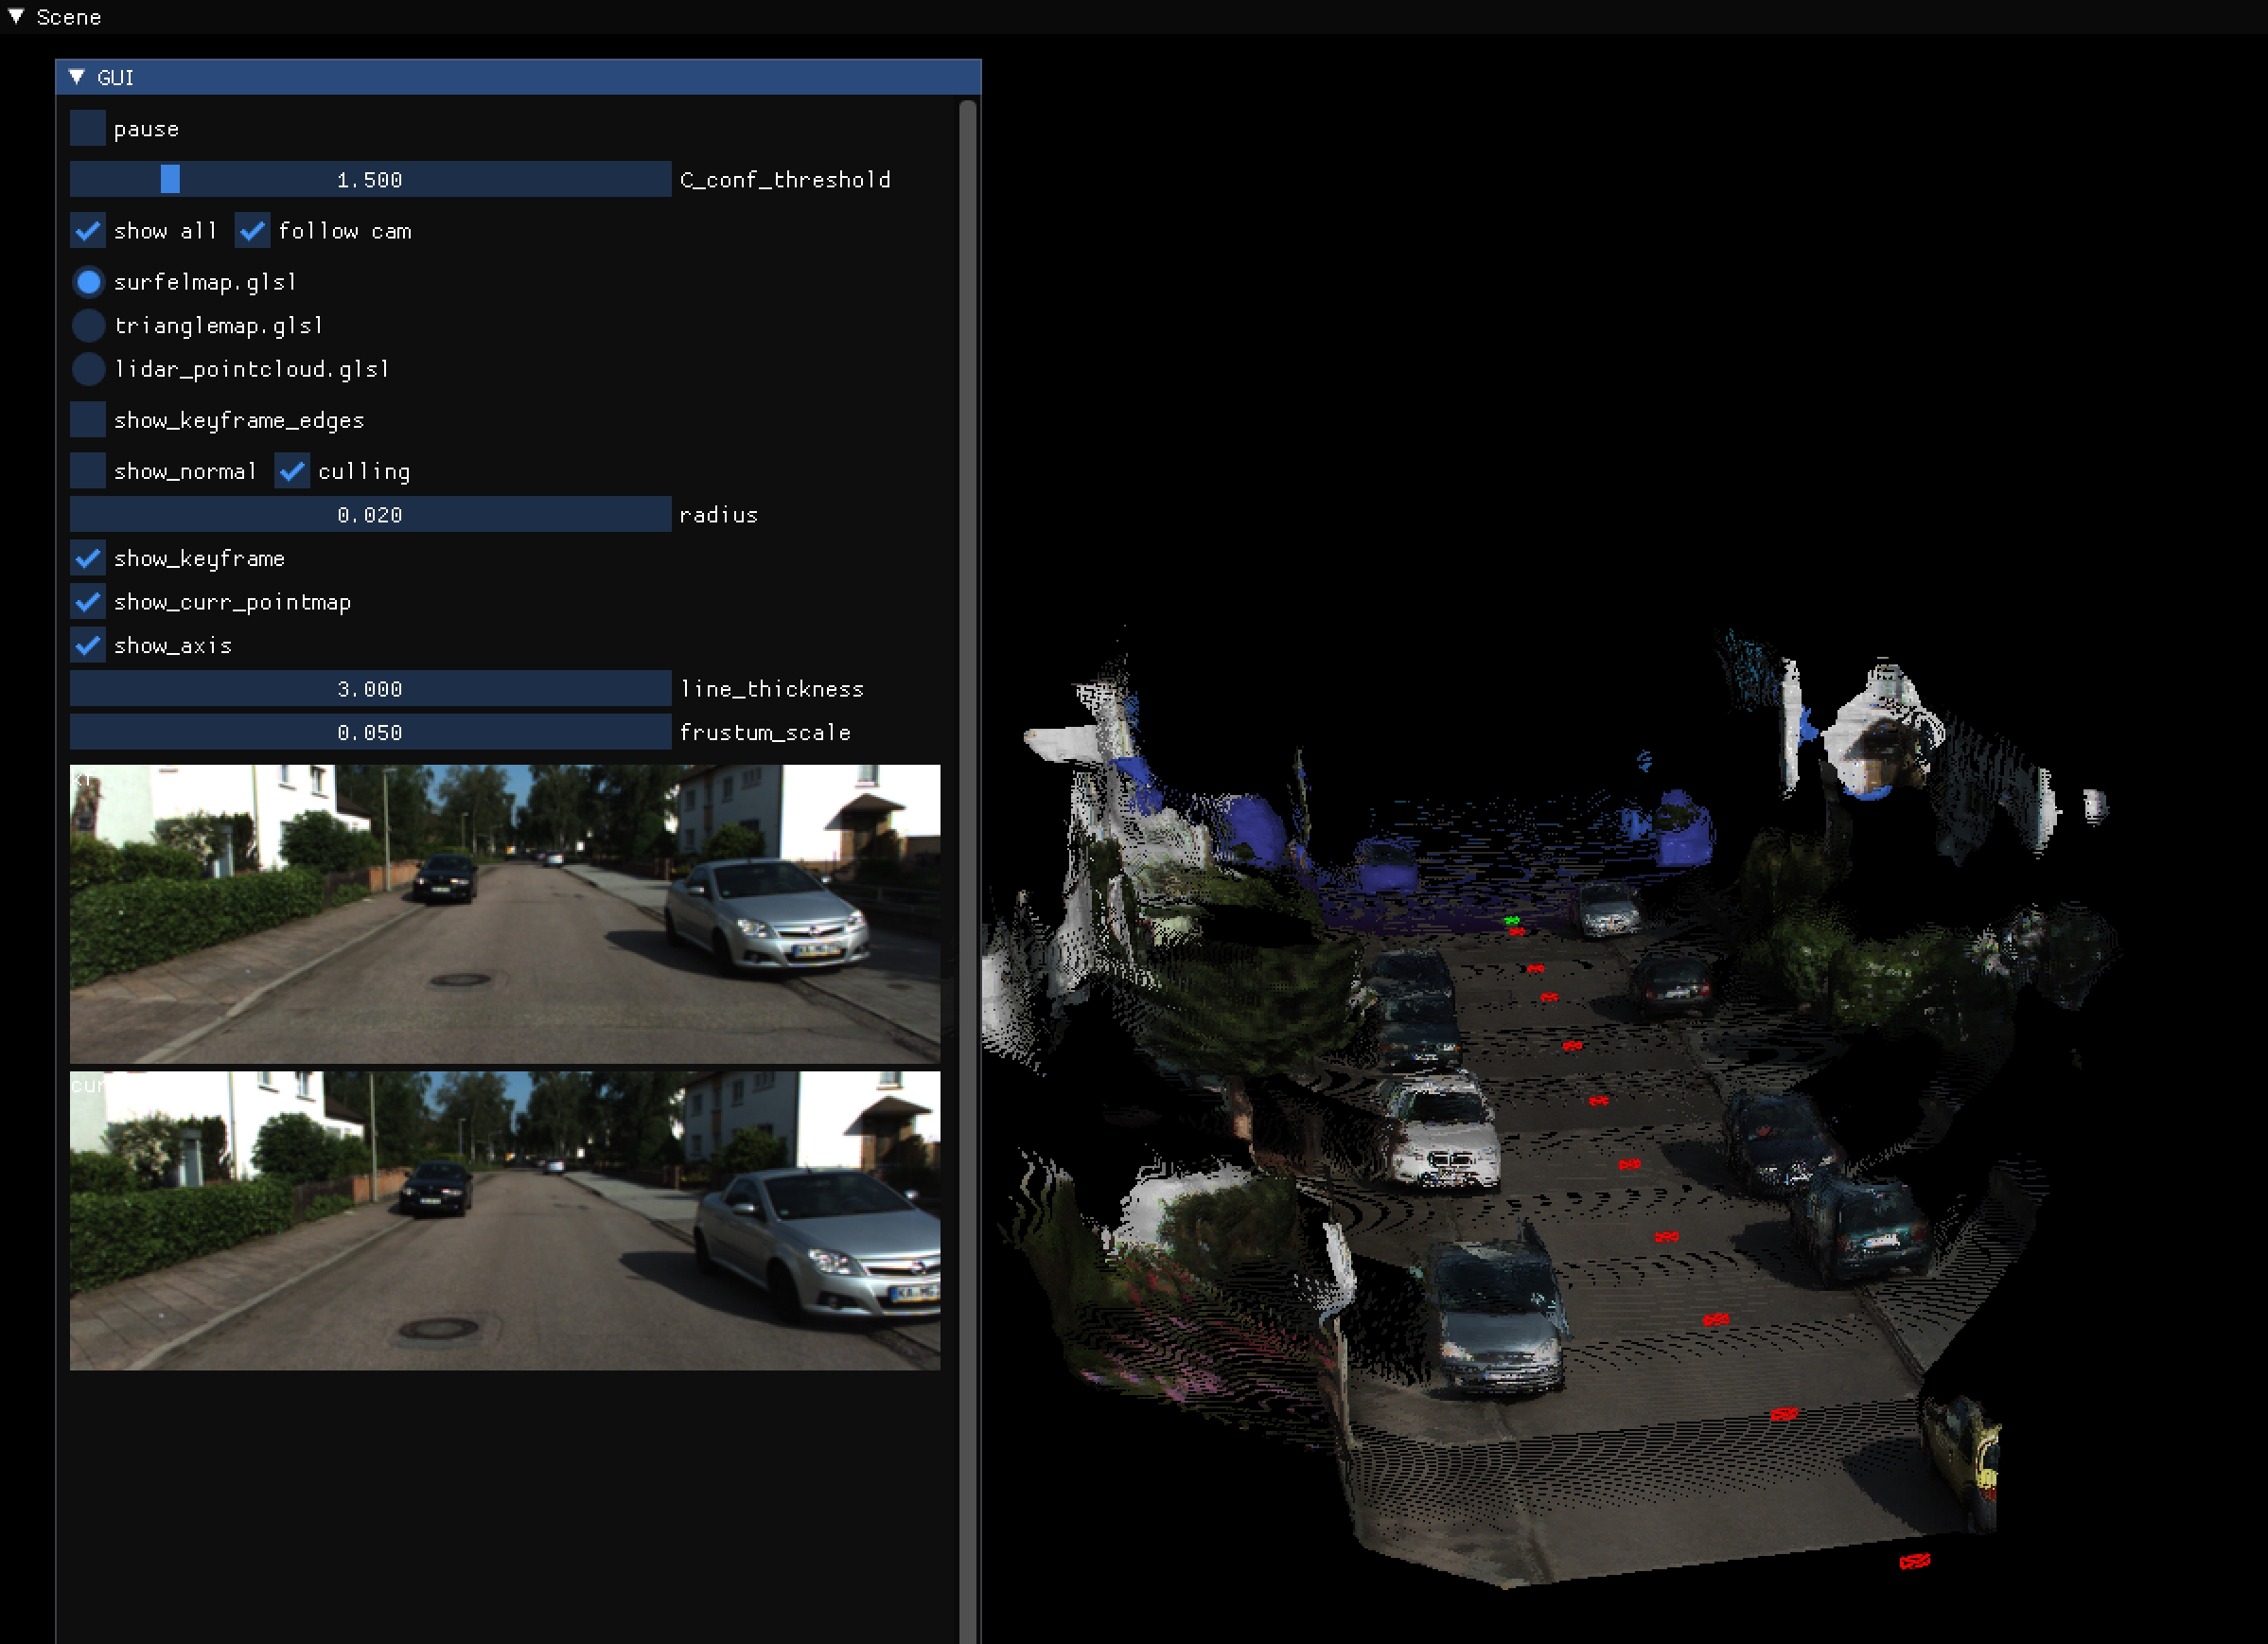
实验效果如下所示:
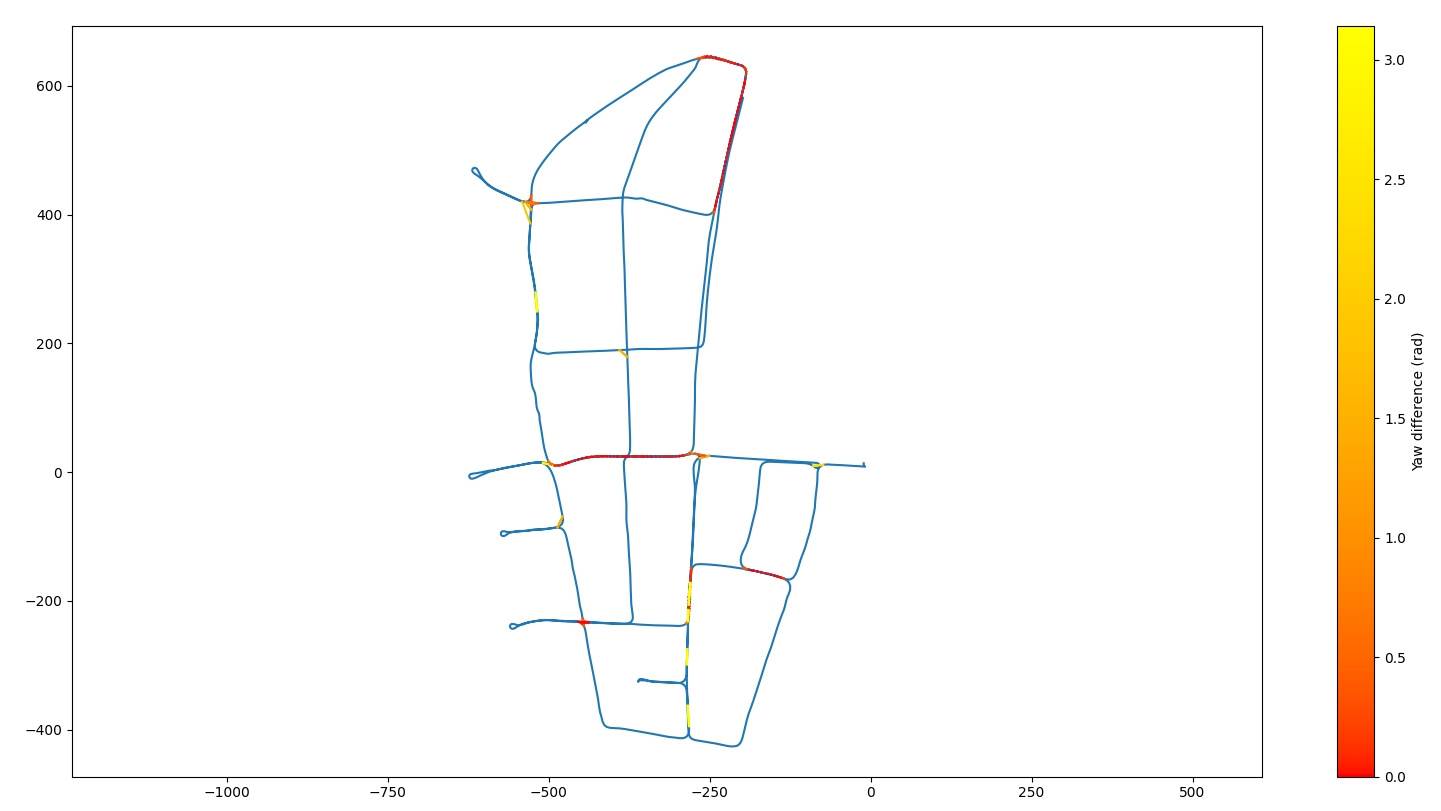
- 接下来开启带回环的:
bash batch_kitti360_loop.sh # for global optimization
下面是带回环的轨迹:
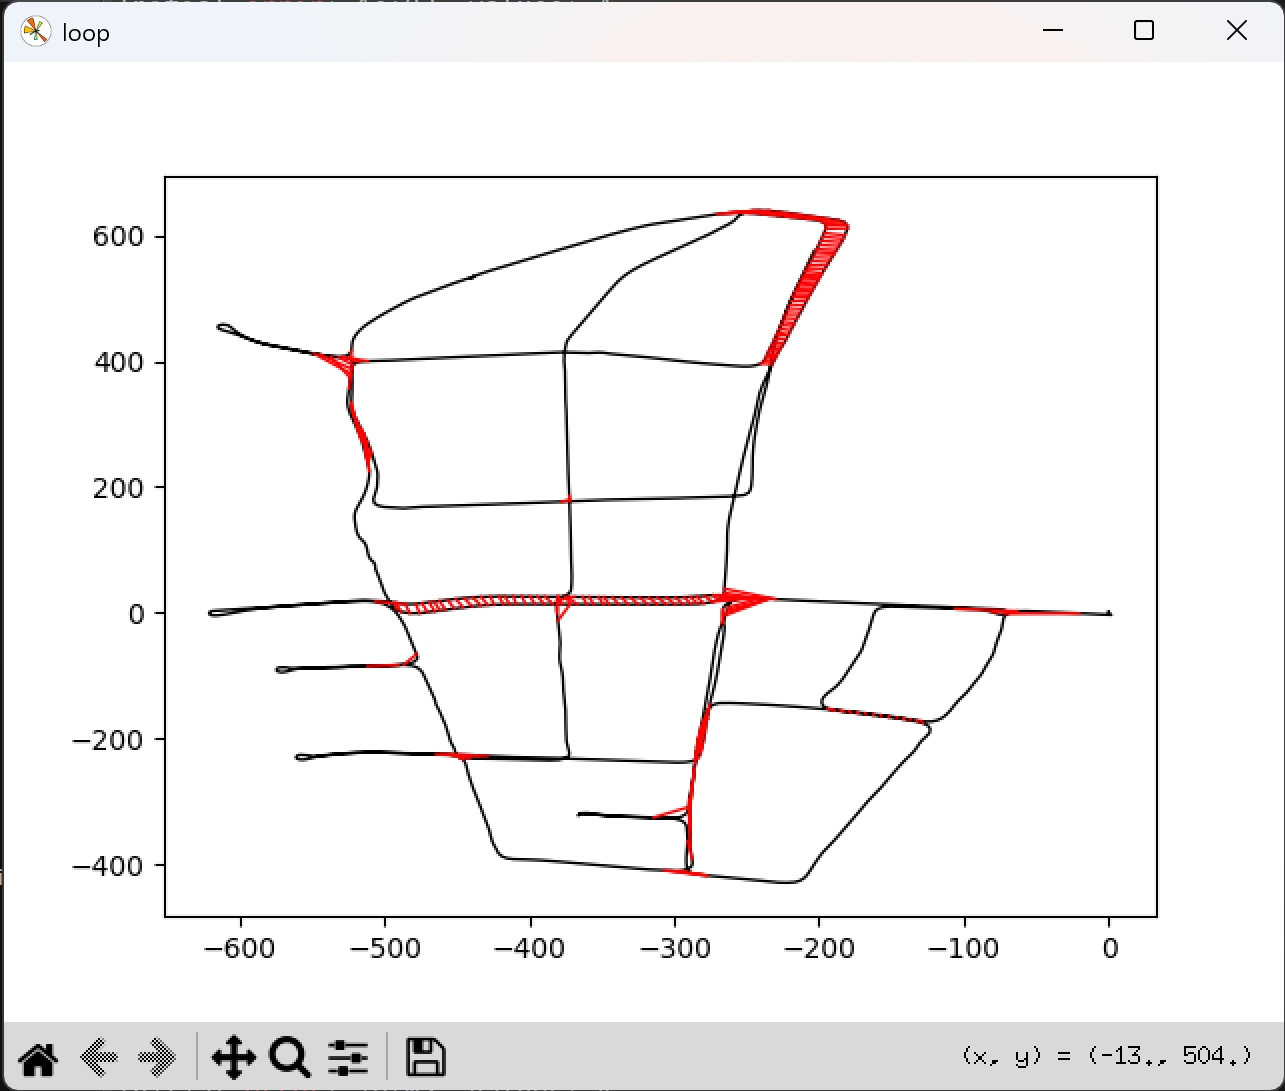
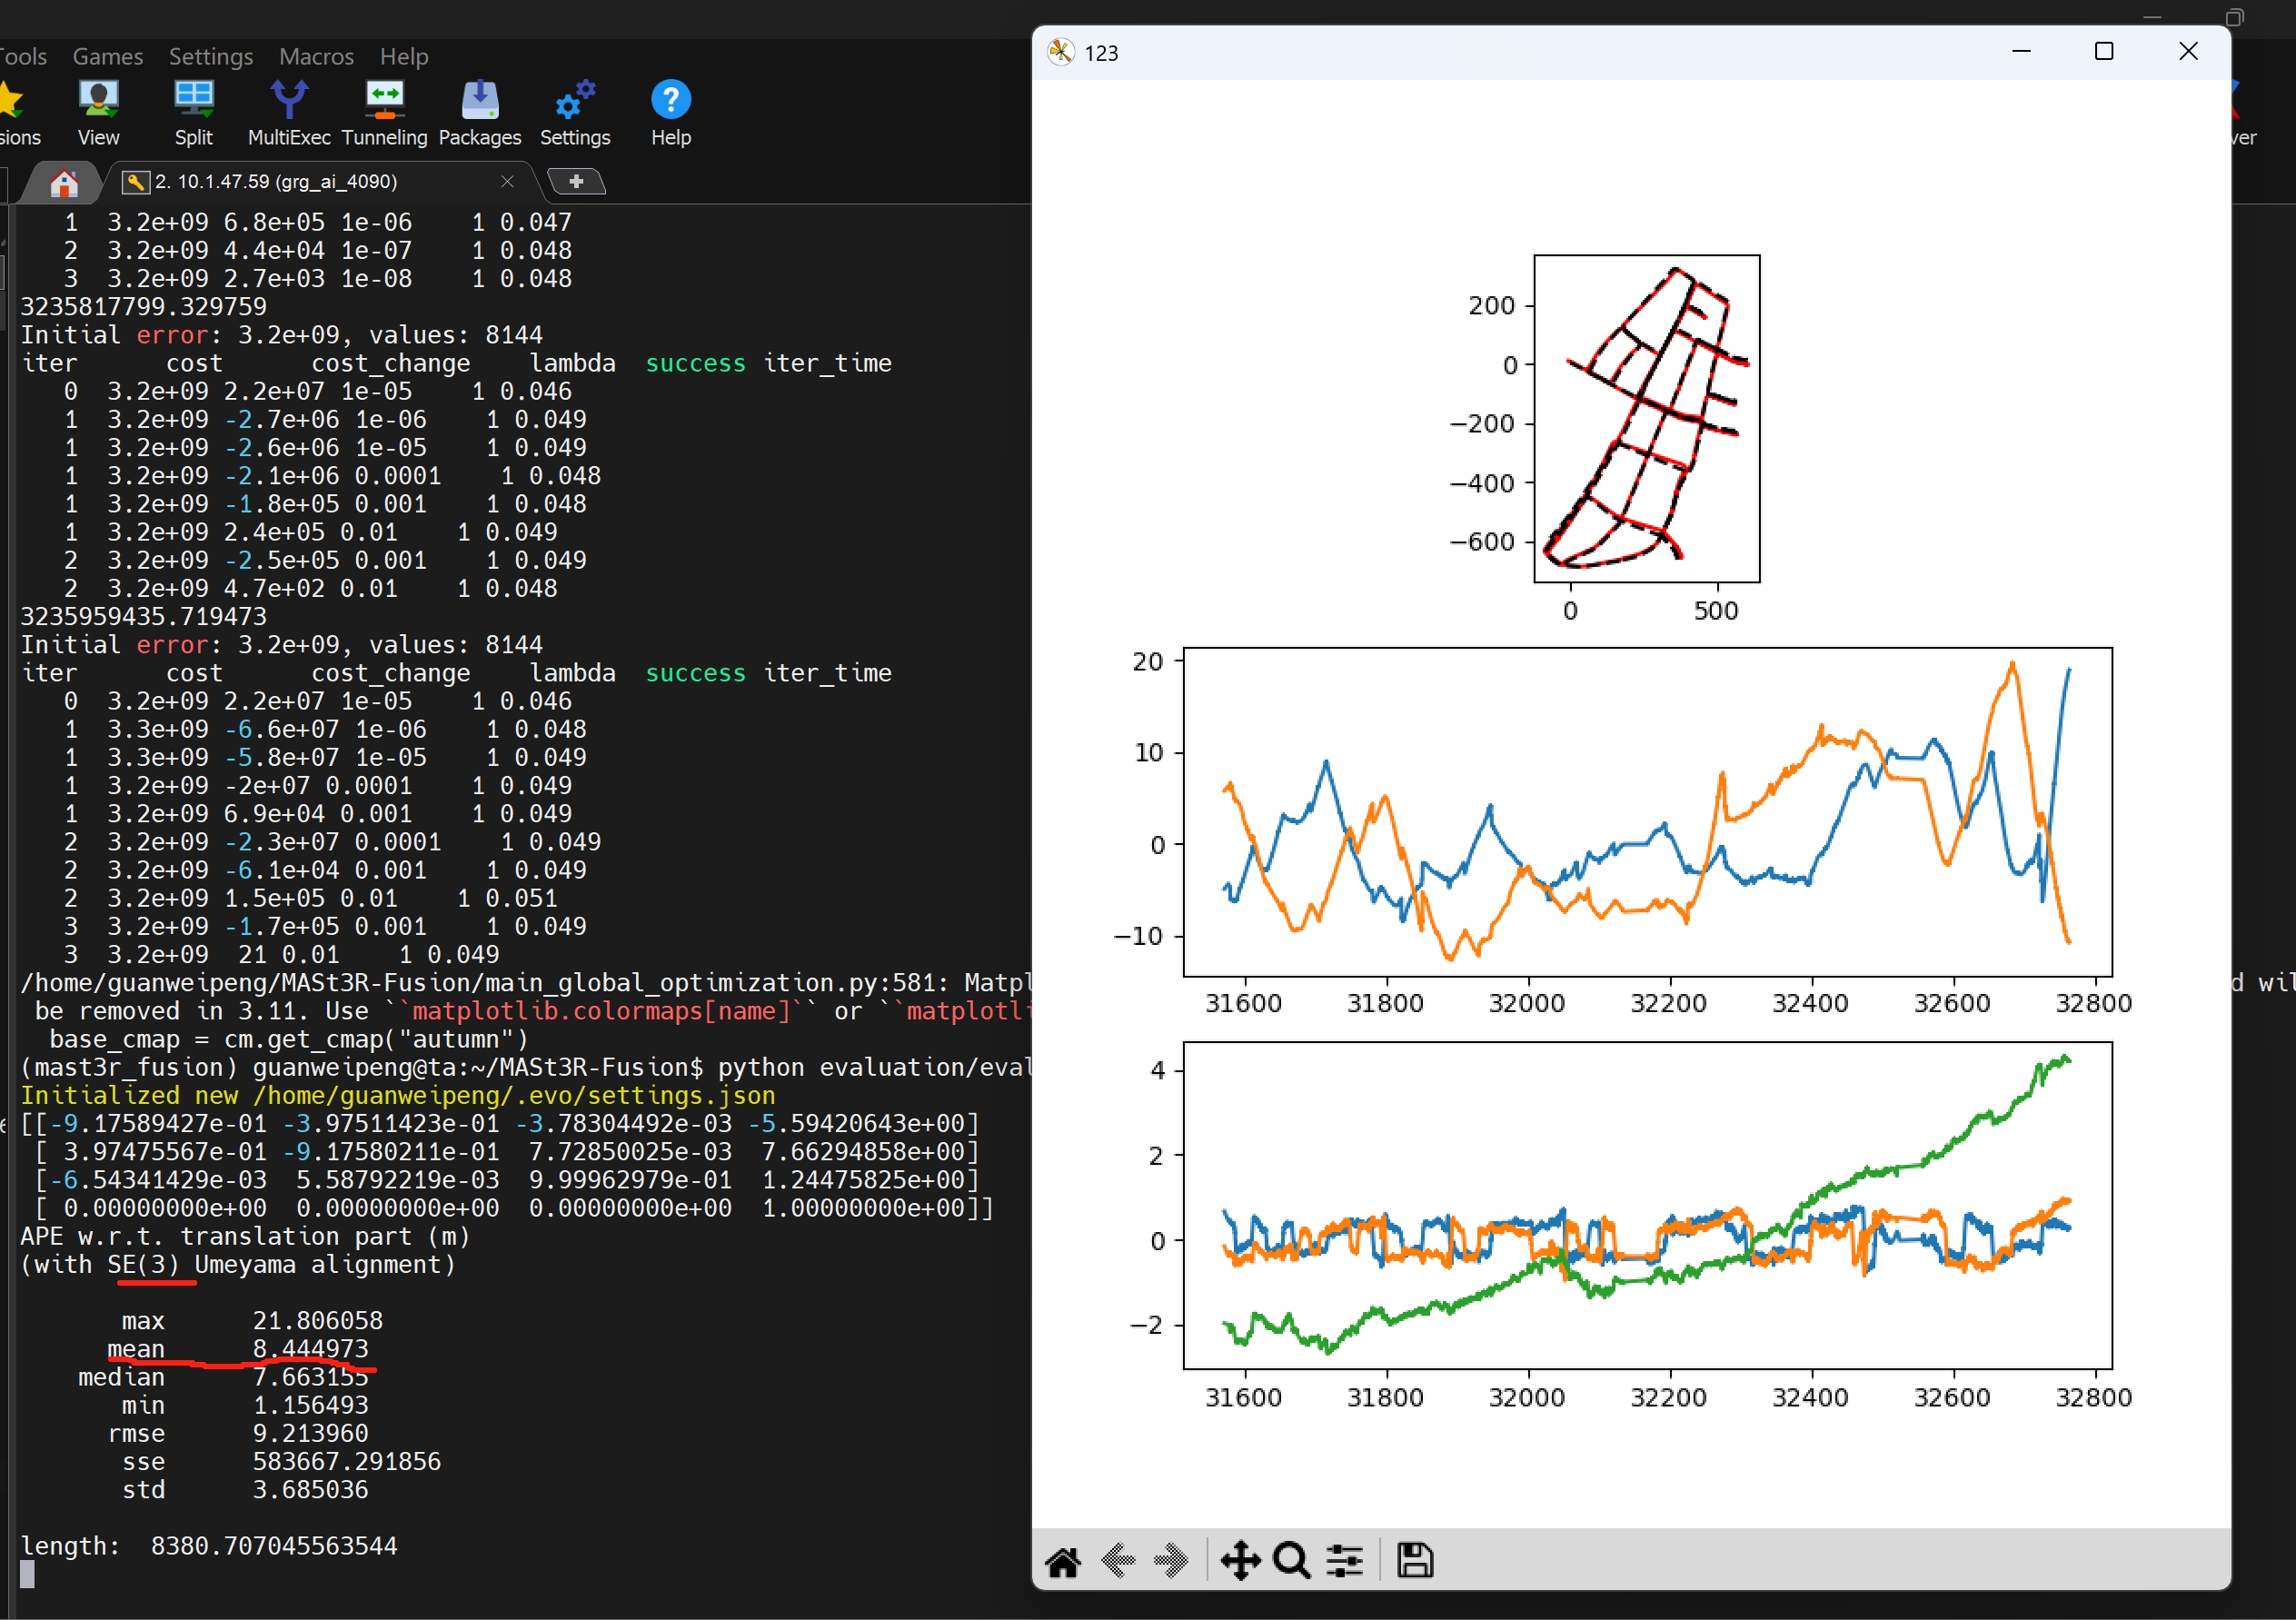
接下来验证估算的轨迹效果:
python evaluation/evaluate_kitti360.py
可视化三维重建的效果:
python evaluation/check_h5.py --config config/base_kitti360.yaml \
         --h5 data_0000.h5 \
         --calib config/intrinsics_kitti360.yaml # using real-time poses

python evaluation/check_h5.py --config config/base_kitti360.yaml \
         --h5 data_0000.h5 \
         --calib config/intrinsics_kitti360.yaml \
         --pose_file result_post_0000.txt  # using globally optimized poses

CUDA_VISIBLE_DEVICES=0,1 python evaluation/check_h5.py --config config/base_kitti360.yaml   --h5 data_0000.h5 --calib config/intrinsics_kitti360.yaml   --pose_file result_post_0000.txt
# 注意源码中需要在“keyframes = SharedKeyframes(manager, h, w,buffer=1024) ”前添加 h = 176 以及   w = 512
NAVIDA Thor配置
- 环境配置
# rm -rf .git
git clone git@github.com:R-C-Group/MASt3R-Fusion-comment.git --recursive

conda create -n mast3r_fusion python=3.11.9
conda activate mast3r_fusion
# conda remove --name mast3r_fusion --all
# pip install torch==2.5.1 torchvision==0.20.1 torchaudio==2.5.1 --index-url https://download.pytorch.org/whl/cu124
pip3 install torch torchvision torchaudio --index-url https://download.pytorch.org/whl/cu130
pip install opencv-python==4.10.0.84 opencv-contrib-python==4.10.0.84
pip install h5py pyparsing
- 安装GTSAM,这是作者修改版本的,包含了边缘化以及Sim(3)视觉约束
conda activate mast3r_fusion

# git clone https://github.com/yuxuanzhou97/gtsam.git
git clone git@github.com:yuxuanzhou97/gtsam.git
cd gtsam
# cd .. && rm -rf build/
mkdir build && cd build
# cmake .. -DGTSAM_BUILD_PYTHON=1 -DGTSAM_PYTHON_VERSION=3.11.9 -DPYTHON_EXECUTABLE=`which python` -Dpybind11_INCLUDE_DIR=$PYBIND11_INCLUDE_DIR
cmake .. \
  -DGTSAM_BUILD_PYTHON=1 \
  -DGTSAM_PYTHON_VERSION=3.11.9 \
  -DPYTHON_EXECUTABLE=`which python` \
  -Dpybind11_INCLUDE_DIR=$PYBIND11_INCLUDE_DIR \
  -DGTSAM_BUILD_WITH_SERIALIZATION=OFF \
  -DGTSAM_PYTHON_BUILD_WITH_SERIALIZATION=OFF \
  -DGTSAM_BUILD_UNSTABLE=OFF \
  -DCMAKE_CXX_STANDARD=17

make python-install -j12
- 可能会出现调用
/usr/include/pybind11/等问题,需要安装最新版的pybind11,然后重新运行。
pip install --upgrade pybind11

# 获取详细的 pybind11 信息
PYBIND11_INCLUDE_DIR=$(python -c "import pybind11; print(pybind11.get_include())")
PYBIND11_CMAKE_DIR=$(python -c "import pybind11; import os; print(os.path.join(pybind11.__path__[0], 'share', 'cmake', 'pybind11'))")

echo "Pybind11 include: $PYBIND11_INCLUDE_DIR"
echo "Pybind11 cmake: $PYBIND11_CMAKE_DIR"
- GCC13编译问题:GCC 13 与 Boost Serialization 库在处理 std::optional 时的兼容性问题。GCC 13 更加严格地执行 C++17 标准,而 GTSAM 中某些序列化的模板推导在遇到 boost::serialization 的前向声明(即报错中的 struct boost::serialization::U)时,无法正确解析。
sudo apt install gcc-11 g++-11

# 查看gcc版本
gcc --version #出现的是默认版本
gcc-11 --version #出现新安装版本

cmake .. \
  -DCMAKE_C_COMPILER=gcc-11 \
  -DCMAKE_CXX_COMPILER=g++-11 \
  -DGTSAM_BUILD_PYTHON=1 \
  -DGTSAM_PYTHON_VERSION=3.11.9 \
  -DPYTHON_EXECUTABLE=`which python` \
  -Dpybind11_INCLUDE_DIR=$PYBIND11_INCLUDE_DIR
- 工程安装:
cd {根目录}
conda activate mast3r_fusion
# pip install -e thirdparty/mast3r
pip install --no-build-isolation -e thirdparty/mast3r

pip install -e thirdparty/in3d

# torchcodec的安装
git clone https://github.com/pytorch/torchcodec
cd torchcodec
# 确保你在对应的虚拟环境下
export I_CONFIRM_THIS_IS_NOT_A_LICENSE_VIOLATION=1
pip install . --no-build-isolation
# python -c "import torchcodec; print(f'Version: {torchcodec.__version__}'); from torchcodec import decoders; print('Decoders module: FOUND')"

pip install --no-build-isolation -e .
# pyproject.toml中去掉了pyrealsense2,这是RealSense 相机的依赖
-
查看系统架构
python -c "import torch; print(torch.cuda.get_device_capability())",Thor为(11,0) -
下载权重文件
mkdir -p checkpoints/
wget https://download.europe.naverlabs.com/ComputerVision/MASt3R/MASt3R_ViTLarge_BaseDecoder_512_catmlpdpt_metric.pth -P checkpoints/
wget https://download.europe.naverlabs.com/ComputerVision/MASt3R/MASt3R_ViTLarge_BaseDecoder_512_catmlpdpt_metric_retrieval_trainingfree.pth -P checkpoints/
wget https://download.europe.naverlabs.com/ComputerVision/MASt3R/MASt3R_ViTLarge_BaseDecoder_512_catmlpdpt_metric_retrieval_codebook.pkl -P checkpoints/
- 下载KITTI-360数据集:
- 首先,需要下载KITTI的
Perspective Images for Train & Val (128G)。运行cd dataset && bash download_2d_perspective_unrectified.sh来下载; - 其次,还需下载预备的IMU及GT数据:Google Drive
- 首先,需要下载KITTI的
运行下面测试:
conda activate mast3r_fusion

bash batch_kitti360_vi.sh # for real-time SLAM
测试效果如图所示


CPU占用约44.1%(占整体),GPU显存消耗18G左右
代码架构梳理
- 系统入口与初始化
batch_kitti360_vi.sh: 脚本入口,配置数据集、内参、IMU 时间偏移等参数,并启动main.py。main.py: 实际代码入口。负责初始化 MAST3R 模型、多进程共享状态、加载数据集,并协调前端追踪与后端优化的运行。
- 前端追踪 (Front-end Tracking)
tracker.py: 负责即时位姿估计。
- 使用
mast3r_match_asymmetric进行当前帧与参考关键帧的特征匹配(data association)。 - 通过
opt_pose_calib_sim3(重投影误差)或opt_pose_ray_dist_sim3(光线距离)优化 Sim3 位姿。 - 关键帧选择: 当匹配质量下降时,触发新关键帧的建立。
- 后端优化 (Back-end Optimization)
global_opt.py: 管理全局一致性。
- 基于 Gtsam 构建因子图。
- 视觉因子: 维护多帧之间的对称匹配约束。
- 惯性因子: 处理 IMU 预积分,通过
solve_VI_init进行视觉惯性对齐。 - 滑动窗口与边缘化: 通过
solve_GN_calib实现高效的滑动窗口优化,并对旧帧进行边缘化处理。
- 其他,如数据结构与检索
frame.py: 定义了Frame对象及其在共享内存中的存储方式 (SharedKeyframes)。支持多种 point cloud 融合模式(如加权平均、球面平均)。retrieval_database.py: 基于 ASMK 的图像检索库,用于重定位和回环检测,增强系统的鲁棒性。
- 运行流程图:
graph TD
%% 定义全局样式类:透明背景、黑边、黑字
classDef plain fill:none,stroke:#000,stroke-width:2px,color:#000;
A[数据输入 IMU/Image] --> B[main.py 初始化]
B --> C[tracker.py 前端追踪]
C --> D{是否为关键帧?}
D -- 是 --> E[global_opt.py 后端优化]
D -- 否 --> C
E --> F[结果保存与可视化]
C --> G[retrieval_database.py 重定位/回环]
G --> C
%% 将样式应用到所有节点
class A,B,C,D,E,F,G plain;
项目总览
MASt3R-Fusion 是一个基于 MASt3R(多视角立体匹配网络)的 视觉-惯性 SLAM(Simultaneous Localization And Mapping,同步定位与建图) 系统。它将 MASt3R 的深度学习密集匹配能力与 IMU(惯性测量单元)数据融合,通过 GTSAM 因子图优化框架实现精确的位姿估计和三维重建。
核心特性
| 特性 | 说明 |
|---|---|
| 视觉前端 | 基于 MASt3R 的密集特征提取与匹配 |
| 位姿跟踪 | 基于 Sim3(相似变换群)的帧到关键帧位姿优化 |
| 后端优化 | GTSAM 因子图 + LM 优化器,支持视觉因子、IMU 预积分因子、GNSS 因子 |
| 回环检测 | 基于图像检索的回环检测与回环约束 |
| 全局优化 | 离线全局位姿图优化,融合视觉、IMU、GNSS 数据 |
| 滑动窗口 | 边缘化机制实现有限内存下的实时运行 |
项目目录结构
MASt3R-Fusion-comment/
├── main.py                          # 🚀 主程序入口:在线视觉-惯性 SLAM
├── main_loop.py                     # 🔁 回环检测主程序
├── main_global_optimization.py      # 🌐 离线全局优化主程序
├── config/                          # ⚙️ 配置文件
│   ├── base_kitti360.yaml           #    KITTI360 数据集基础配置
│   ├── base_subt_handheld.yaml      #    SubT 数据集配置
│   └── intrinsics_*.yaml            #    相机内参与 IMU-相机外参
├── mast3r_fusion/                   # 📦 核心包
│   ├── config.py                    #    配置文件加载与合并
│   ├── dataloader.py                #    数据集加载器(多种格式支持)
│   ├── frame.py                     #    帧(Frame)与关键帧(Keyframe)管理
│   ├── geometry.py                  #    几何运算(投影、反投影、射线约束等)
│   ├── global_opt.py                #    ⭐ 核心:因子图 + 位姿优化
│   ├── tracker.py                   #    帧跟踪器(帧到关键帧位姿估计)
│   ├── matching.py                  #    密集匹配(迭代投影 + 亚像素精细化)
│   ├── mast3r_utils.py              #    MASt3R 模型加载与推理封装
│   ├── retrieval_database.py        #    图像检索数据库(倒排索引)
│   ├── vio_utils.py                 #    视觉-惯性对齐(VIO 初始化)
│   ├── visualization.py             #    3D 可视化窗口(OpenGL)
│   ├── visualization_utils.py       #    可视化辅助工具
│   ├── nonlinear_optimizer.py       #    非线性优化工具(收敛判断、鲁棒核函数)
│   ├── multiprocess_utils.py        #    多进程通信工具
│   ├── lietorch_utils.py            #    Lie 群工具(Sim3 → SE3 转换)
│   ├── image.py                     #    图像梯度计算
│   ├── tictoc.py                    #    计时器
│   ├── evaluate.py                  #    评估与结果保存
│   ├── geoFunc/                     #    大地坐标与惯性导航工具库
│   │   ├── const_value.py           #       WGS-84 常量
│   │   ├── trans.py                 #       坐标变换(ECEF↔ENU、姿态角↔旋转矩阵)
│   │   └── data_utils.py            #       IMU 数据池、图像数据集加载
│   └── backend/                     #    C++ 后端加速模块
├── evaluation/                      # 📊 评估脚本
│   ├── evaluate_kitti360.py
│   ├── evaluate_subt.py
│   └── check_h5.py
├── thirdparty/                      # 第三方依赖
├── gtsam/                           # GTSAM 因子图优化库
└── resources/                       # OpenGL 着色器资源
系统架构与数据流
整体运行流程
┌─────────────────────────────────────────────────────────────┐
│                     main.py 主循环                           │
│                                                             │
│  1. 加载模型 (MASt3R)                                        │
│  2. 加载数据集                                               │
│  3. 循环读取每一帧图像:                                       │
│     ├─ INIT 模式: 单目推理初始化第一帧 → 切换到 TRACKING       │
│     ├─ TRACKING 模式: tracker 跟踪当前帧到上一关键帧           │
│     │   └─ 判断是否需要插入新关键帧                            │
│     ├─ RELOC 模式: 重定位(跟踪丢失时触发)                   │
│     └─ 运行后端优化:                                          │
│         ├─ 图像检索找回环候选                                  │
│         ├─ 添加视觉因子到因子图                                │
│         ├─ 添加 IMU 预积分因子                                 │
│         ├─ Gauss-Newton 求解位姿                               │
│         └─ 触发 V-I 初始化(7 帧后)                          │
│  4. 保存因子图 & 帧数据到 h5/pkl                              │
│  5. 可选:启动 3D 可视化进程                                  │
└─────────────────────────────────────────────────────────────┘
            ↓ 输出 graph.pkl + data.h5
┌─────────────────────────────────────────────────────────────┐
│                 main_loop.py 回环检测                         │
│                                                             │
│  1. 从 h5 加载所有关键帧                                      │
│  2. 使用图像检索查找回环候选                                  │
│  3. 基于置信度地图过滤候选                                    │
│  4. 对每对回环候选进行 MASt3R 匹配 + 位姿求解                 │
│  5. 输出 graph_loop.pkl                                      │
└─────────────────────────────────────────────────────────────┘
            ↓
┌─────────────────────────────────────────────────────────────┐
│           main_global_optimization.py 全局优化                │
│                                                             │
│  1. 加载 graph.pkl + graph_loop.pkl                          │
│  2. 构建包含所有因子的 GTSAM 因子图:                          │
│     ├─ 视觉因子(Hessian → GTSAM 线性容器因子)              │
│     ├─ IMU 预积分因子                                         │
│     ├─ 回环因子(带 Cauchy 鲁棒核)                          │
│     ├─ GNSS 因子(可选)                                     │
│     └─ 外参约束因子                                           │
│  3. 迭代 6 轮 LM 优化                                        │
│  4. 输出优化后的结果                                          │
└─────────────────────────────────────────────────────────────┘
符号约定(GTSAM 变量)
| 符号 | 含义 | 维度 |
|---|---|---|
X(i) |
第 i 帧的相机位姿 (Pose3) | SE(3) = 6DoF |
S(i) |
第 i 帧的尺度因子 | 1 |
Z(i) |
第 i 帧的 IMU 坐标系位姿 (Pose3) | SE(3) |
V(i) |
第 i 帧的速度 | 3 |
B(i) |
第 i 帧的 IMU 偏置 (加速度+陀螺仪) | 6 |
C(i) |
相机-IMU 外参 (Tic) | SE(3) |