引言
SF-Loc应该算是DBA-Fusion(RAL2024)的改进版。
在image+IMU的基础上额外加了map-aided localization.而所谓的map属于priori map,是由稀疏帧(每帧为稠密的深度)来组成的。而要实现map-aided localization,就需要分别解决mapping以及re-localization的两个问题。
针对mapping,需要考虑的则是建图的效率,地图单元的精度以及存储消耗。通过co-visbility等来保证map的稀疏性,通过紧凑的地图表征,使得每公里的map size降低为3 MB.
至于re-localization,首先其是与地图的表征方式紧耦合的,高的回调率(recall)以及高精度就意味着mapping记录的地图信息需要更仔细。作者提出了“visual-structure-frame map representation”它由geo-tagged image frame,compressed RGB map以及full-view depth map组成。
同时通过coarse-to-fine map-aided localization方法,通过集合了基于深度学习的位置识别,局部特征匹配以及时空信息关联。
PS:直观感觉就是在DBA-Fusion的众多约束的基础上加入了map-aided localization的约束。并通过设计相应的地图表征以及coarse-to-fine map-aided localization来实现约束的构建~
@article{zhou2024sf,
  title={SF-Loc: A Visual Mapping and Geo-Localization System based on Sparse Visual Structure Frames},
  author={Zhou, Yuxuan and Li, Xingxing and Li, Shengyu and Xia, Chunxi and Wang, Xuanbin and Feng, Shaoquan},
  journal={arXiv preprint arXiv:2412.01500},
  year={2024}
}
理论解读

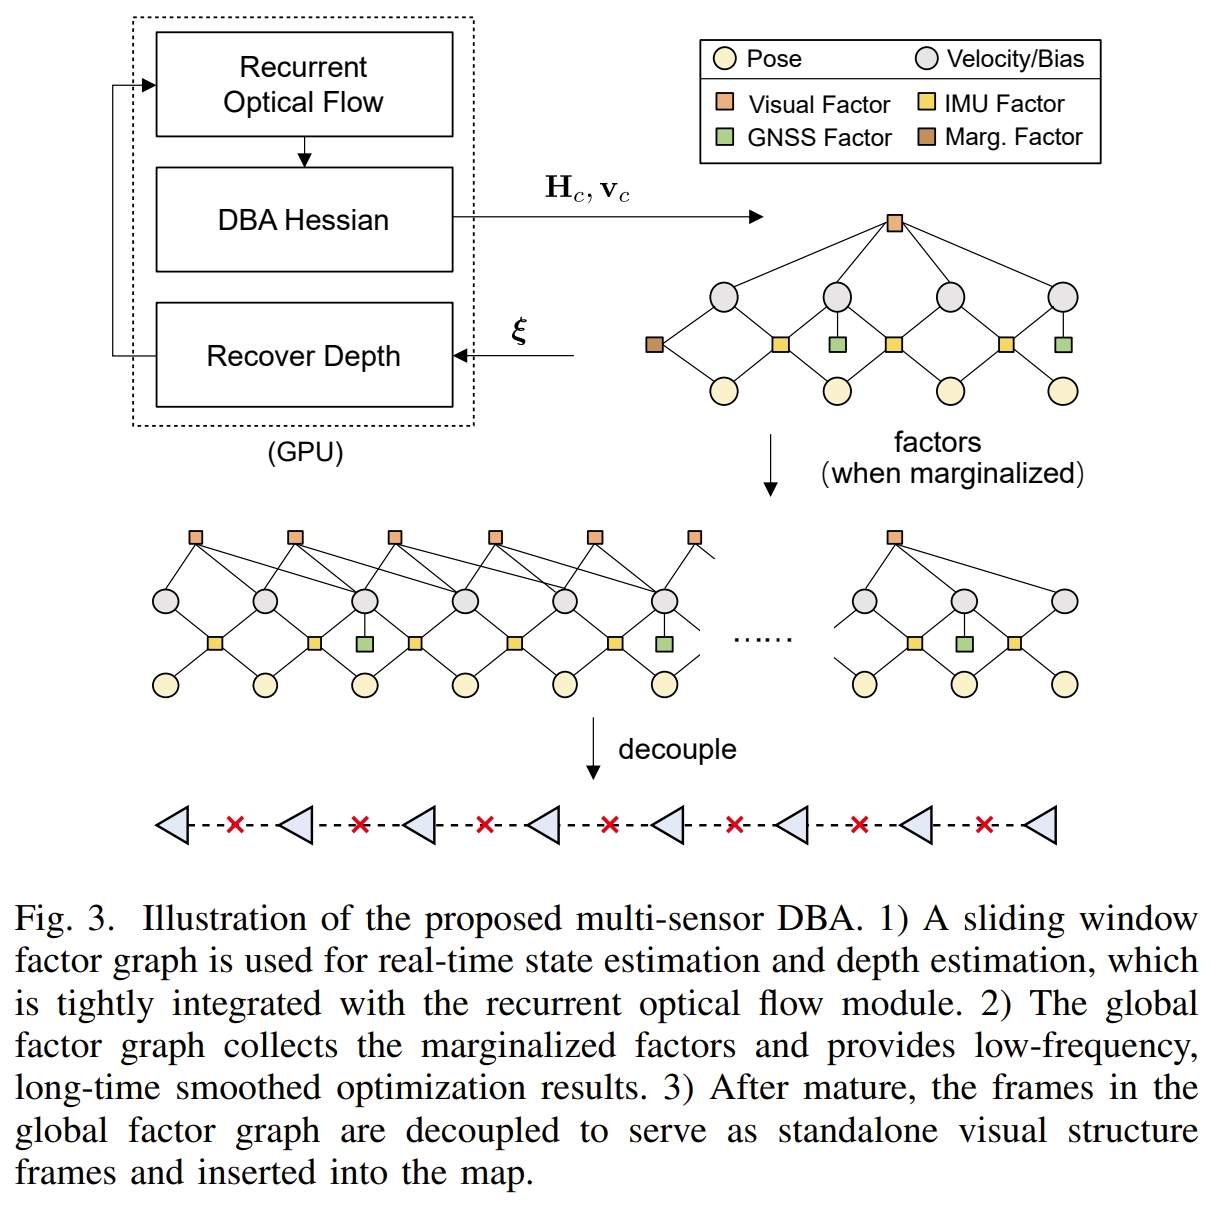
Multi-Sensor Dense Bundle Adjustment
这部分应该是跟DBA-Fusion差不多的,如下图所示
地图的构建与维护
在完成了上个session的全局pose优化后,将每帧的pose与对应的RBG图像(用JPEG压缩),低分辨率的深度图,以及由基于深度网络的Visual place recognition (VPR) 模型生成的全局描述子一起打包(感觉也就是把这些信息整合到一块命名为一个类作为一个proposed的地图表征)。 而为了要保证地图是轻量级的,既要保证地图的稀疏性同时也要保证地图可以增量式构建。
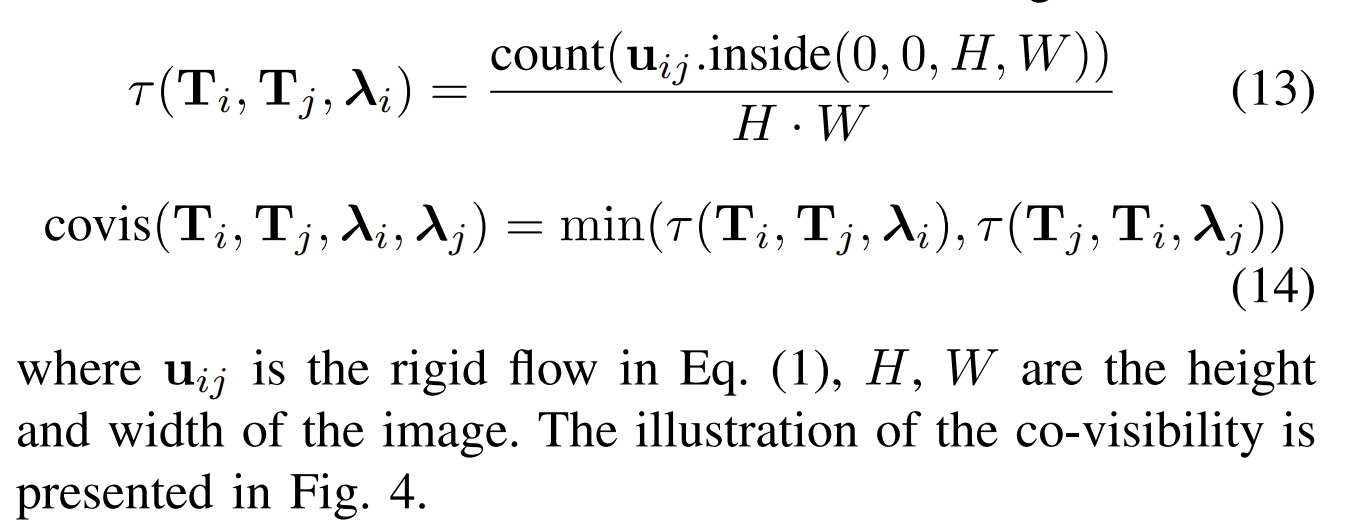
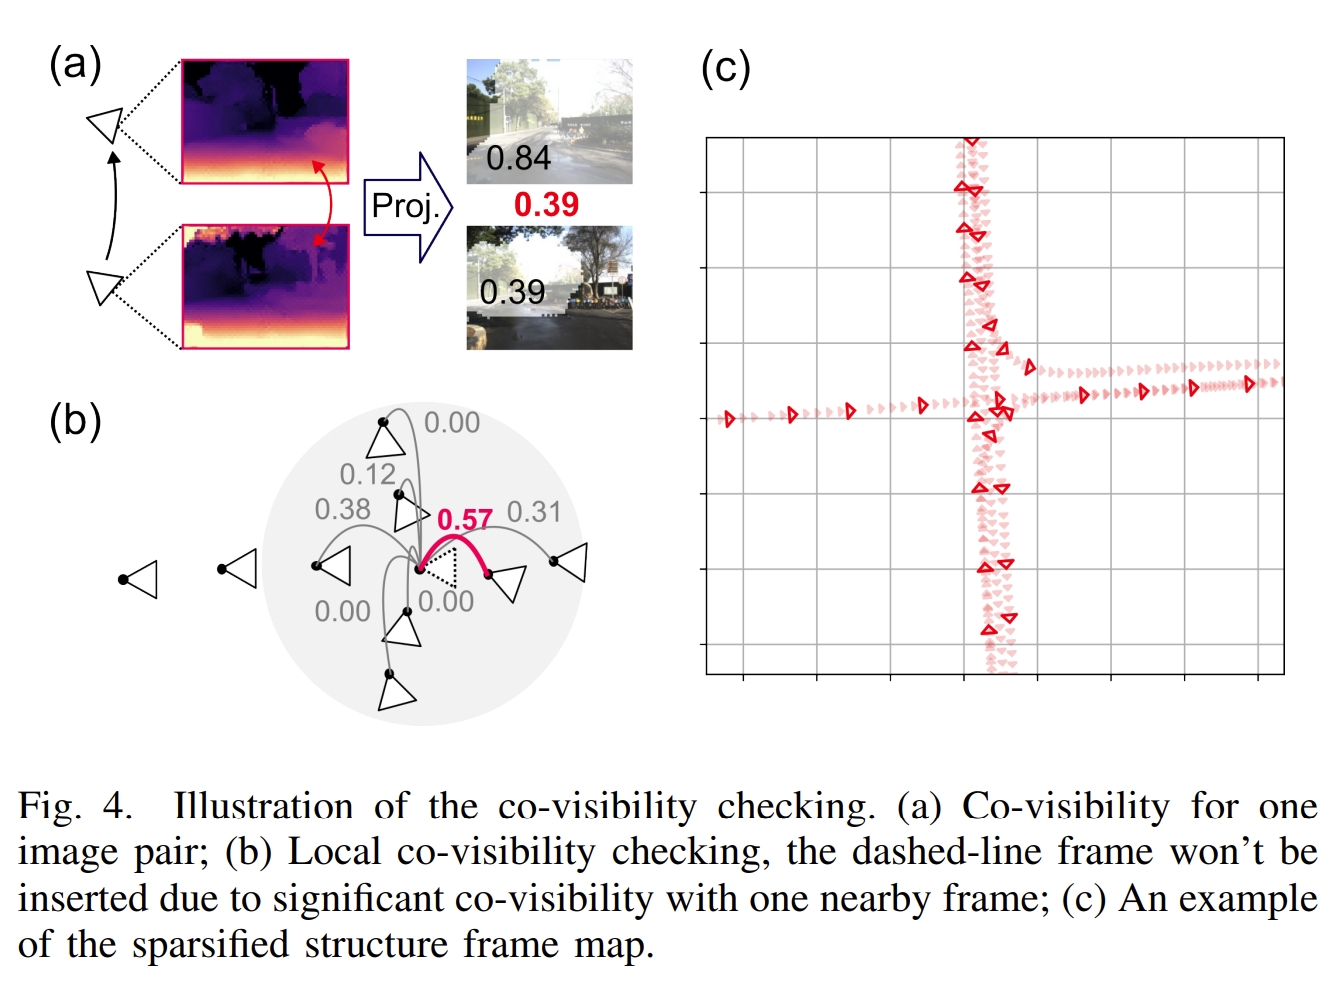
为了保证稀疏性,其实也就是通过共视性。而基于视野内的bi-directional dense rigid flow,有效地计算了共视性
Map-aided localization phase
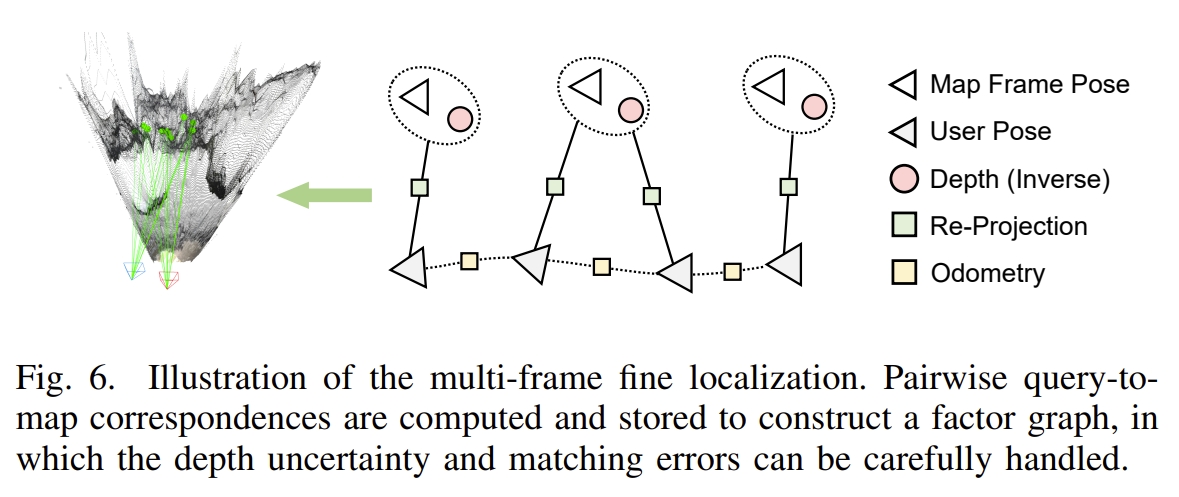
通过采用轻量级的CNN-based method(此处作者引用了好几篇工作,要看代码才知道具体用的那一个),并设计了对应的 spatially smoothed similarity (SSS)方法来实现帧与map的匹配。
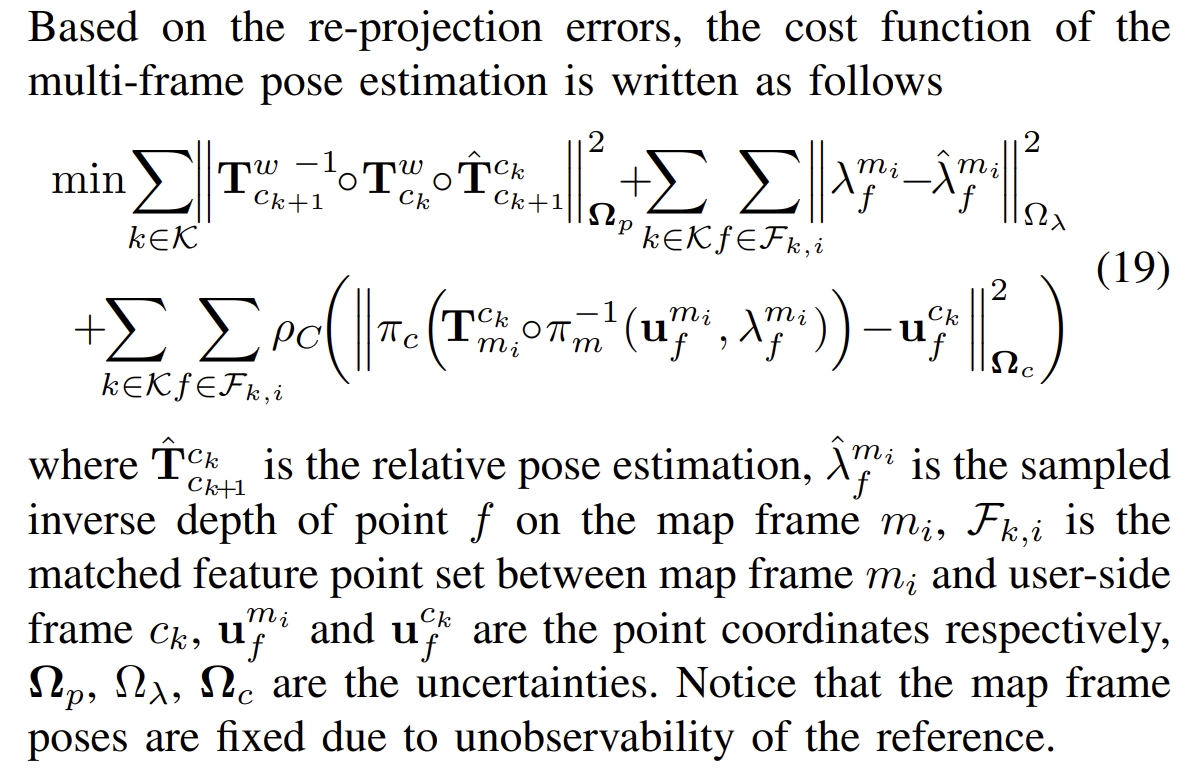
而在匹配后,则相当于完成了coarse estimation,然后通过图优化实现Fine Pose Estimation,如下图所示
代码复现及解读
论文的实验效果此处就不再阐述了,因为主要是用作者采集的数据来验证的,且主要验证recall,coarse以及fine re-localization的精度等。还是要仔细阅读才好分析。
接下来直接进行代码复现测试吧,具体配置过程请见:
安装配置
# git clone --recurse-submodules https://github.com/GREAT-WHU/SF-Loc.git
# 注意原版的需要从submodules下载
git clone --recurse-submodules https://github.com/KwanWaiPang/SF-Loc_comment.git
cd SF-Loc

conda create -n sfloc python=3.10.11
conda activate sfloc
pip install torch==1.11.0+cu113 torchvision==0.12.0+cu113 torchaudio==0.11.0 --extra-index-url https://download.pytorch.org/whl/cu113
pip install torch-scatter==2.0.9 -f https://data.pyg.org/whl/torch-1.11.0+cu113.html
pip install gdown tqdm numpy==1.25.0 numpy-quaternion==2022.4.3 opencv-python==4.7.0.72 scipy pyparsing matplotlib h5py

# for A100 (CUDA12.2或cuda 12.1)
# conda remove --name sfloc --all
pip install torch==2.1.0 torchvision==0.16.0 torchaudio==2.1.0 --index-url https://download.pytorch.org/whl/cu121
pip install torch-scatter -f https://data.pyg.org/whl/torch-2.1.0+cu121.html
pip install gdown tqdm numpy==1.25.0 numpy-quaternion==2022.4.3 opencv-python==4.7.0.72 scipy pyparsing matplotlib h5py
pip install ninja
pip install einops
pip install scikit-learn
- 安装第三方库及GTSAM(注意要安装在conda环境下)
cd thirdparty

git clone https://github.com/yuxuanzhou97/gtsam.git
cd gtsam
mkdir build
cd build
cmake .. -DGTSAM_BUILD_PYTHON=1 -DGTSAM_PYTHON_VERSION=3.10.11
make python-install
- 安装sfloc
conda activate sfloc

python setup.py install
下载权重模型及数据集
实验测试
运行mapping phase
- 先运行下面代码(注意需要更改数据路径),实现多传感器DBA。
conda activate sfloc

CUDA_VISIBLE_DEVICES=0 python launch_dba.py  # This would trigger demo_vio_WHU1023.py automatically (相当于写了个sh运行代码,包含了输入的参数~).
- 此function应该就是相当于进行mapping的过程,会生成以下三个结果
- poses_realtime.txt IMU poses (both in world frame and ECEF frame) estimated by online multi-sensor DBA.
- graph.pkl Serialized GTSAM factors that store the multi-sensor DBA information.
- depth_video.pkl Dense depths estimated by DBA
- 作者在github中提到,这步大概需要90分钟左右来跑完整个序列(但我在A100下测试却远不止一个半小时,都21个小时了,也可能是有其他任务在执行影响了速度吧~)。

- 此步应该就是进行定位、获取GTSAM的因子图以及DBA生成的Depth map
- 然后运行下面代码进行全局图优化
python sf-loc/post_optimization.py --graph results/graph.pkl --result_file results/poses_post.txt
- 会生成结果如下:
- poses_post.txt Estimated IMU poses after global optimization.

- 接下来再通过下面代码来稀疏化关键帧地图
python sf-loc/sparsify_map.py --imagedir WHU1023/image_undist/cam0 --imagestamp WHU1023/stamp.txt --depth_video results/depth_video.pkl --poses_post results/poses_post.txt --calib calib/1023.txt --map_indices results/map_indices.pkl
- 会生成结果如下:
- map_indices.pkl Map frame indices (and timestamps), indicating a subset of all DBA keyframes.
- map_stamps.txt 应该是记录每个map的时间戳
- 获取的应该就是稀疏化后的地图(关键帧)

- 运行下面代码来生成lightweight structure frame map.同时通过VPR-methods-evaluation中所提供的脚本可以很方便的使用不同的VRP方法。
python sf-loc/generate_sf_map.py --imagedir WHU1023/image_undist/cam0 --imagestamp WHU1023/stamp.txt --depth_video results/depth_video.pkl --poses_post results/poses_post.txt --calib calib/1023.txt --map_indices results/map_indices.pkl --map_file sf_map.pkl
- 生成最终的结果如下:
- sf_map.pkl: The structure frame map, which is all you need for re-localization.
- 其中会调用VPR-methods-evaluation来生成及存储识别的描述子

- 最终大概50MB左右的轻量级地图文件可以获取(获取的为49.51MB)。运行下面代码可验证全局pose估计的性能
python scripts/evaluate_map_poses.py


运行Localization phase
- 使用LightGlue(ICCV 2023)作为fine association(进行特征点的匹配),需要先配置安装

|

|
#下载下来并在当前环境下配置
git clone https://github.com/cvg/LightGlue.git && cd LightGlue
rm -rf .git

conda activate sfloc
python -m pip install -e .
- 下载WHU0412数据集
- 运行下面命名来验证定位性能(会导入前面生成的sf_map.pkl)
export DATASET_MAP=WHU1023
export DATASET_USER=WHU0412/WHU0412
python sf-loc/localization_sf_map.py --imagedir $DATASET_USER/image_undist/cam0 --map_file sf_map.pkl  --calib calib/0412.txt --map_extrinsic calib/1023.yaml --user_extrinsic calib/0412.yaml --user_odo_file $DATASET_USER/odo.txt --user_gt_file $DATASET_USER/gt.txt --map_gt_file $DATASET_MAP/gt.txt
- 注意原github作者给的命令有–enable_map_gt和–enable_user_gt,这两个都是要输入参数的,不是store的,因此去掉即可,因为默认就为true
- 而此命令应该就是调用map-based DBA会生成以下两个文件:
- esult_coarse.txt Coarse user localization results (position and map indice) based on VPR.
- result_fine.txt Fine user localization results (local and global poses). 3. 运行下面两个命令分别对两个精度进行验证
python scripts/evaluate_coarse_poses.py
python scripts/evaluate_fine_poses.py

|

|