- 引言
- 使用此博客模板
- 插入图片与动图
- 插入视频
- 插入代码块
- markdown中的数学公式
- 3D可视化插件
- 4D可视化插件
- google搜索引擎中登记网站
- markdown转换器
- 可视化mermaid流程图
- 参考资料
引言
本博客作为基于markdown的静态博客的第一篇博客,用于记录各类型指令以及进行测试~
对于基于markdown静态博客的配置过程可以参考链接,或者直接fork我的github repositories进行配置也可~
使用此博客模板
博客初始化的时候参考的是lemonchann的博客。 而基于初始的模板,本博客做了系列的改进。
- 可以fork此github 仓库然后重命名为自己想要的仓库名
- PS: 无需跟github账户同名,只需用链接:
https://YOUR_username.github.io/YOUR_repository_name/即可接入对应的博客。比如此博客的接入链接为https://kwanwaipang.github.io/Blog_basedon_markdown/ - 需确保对应的
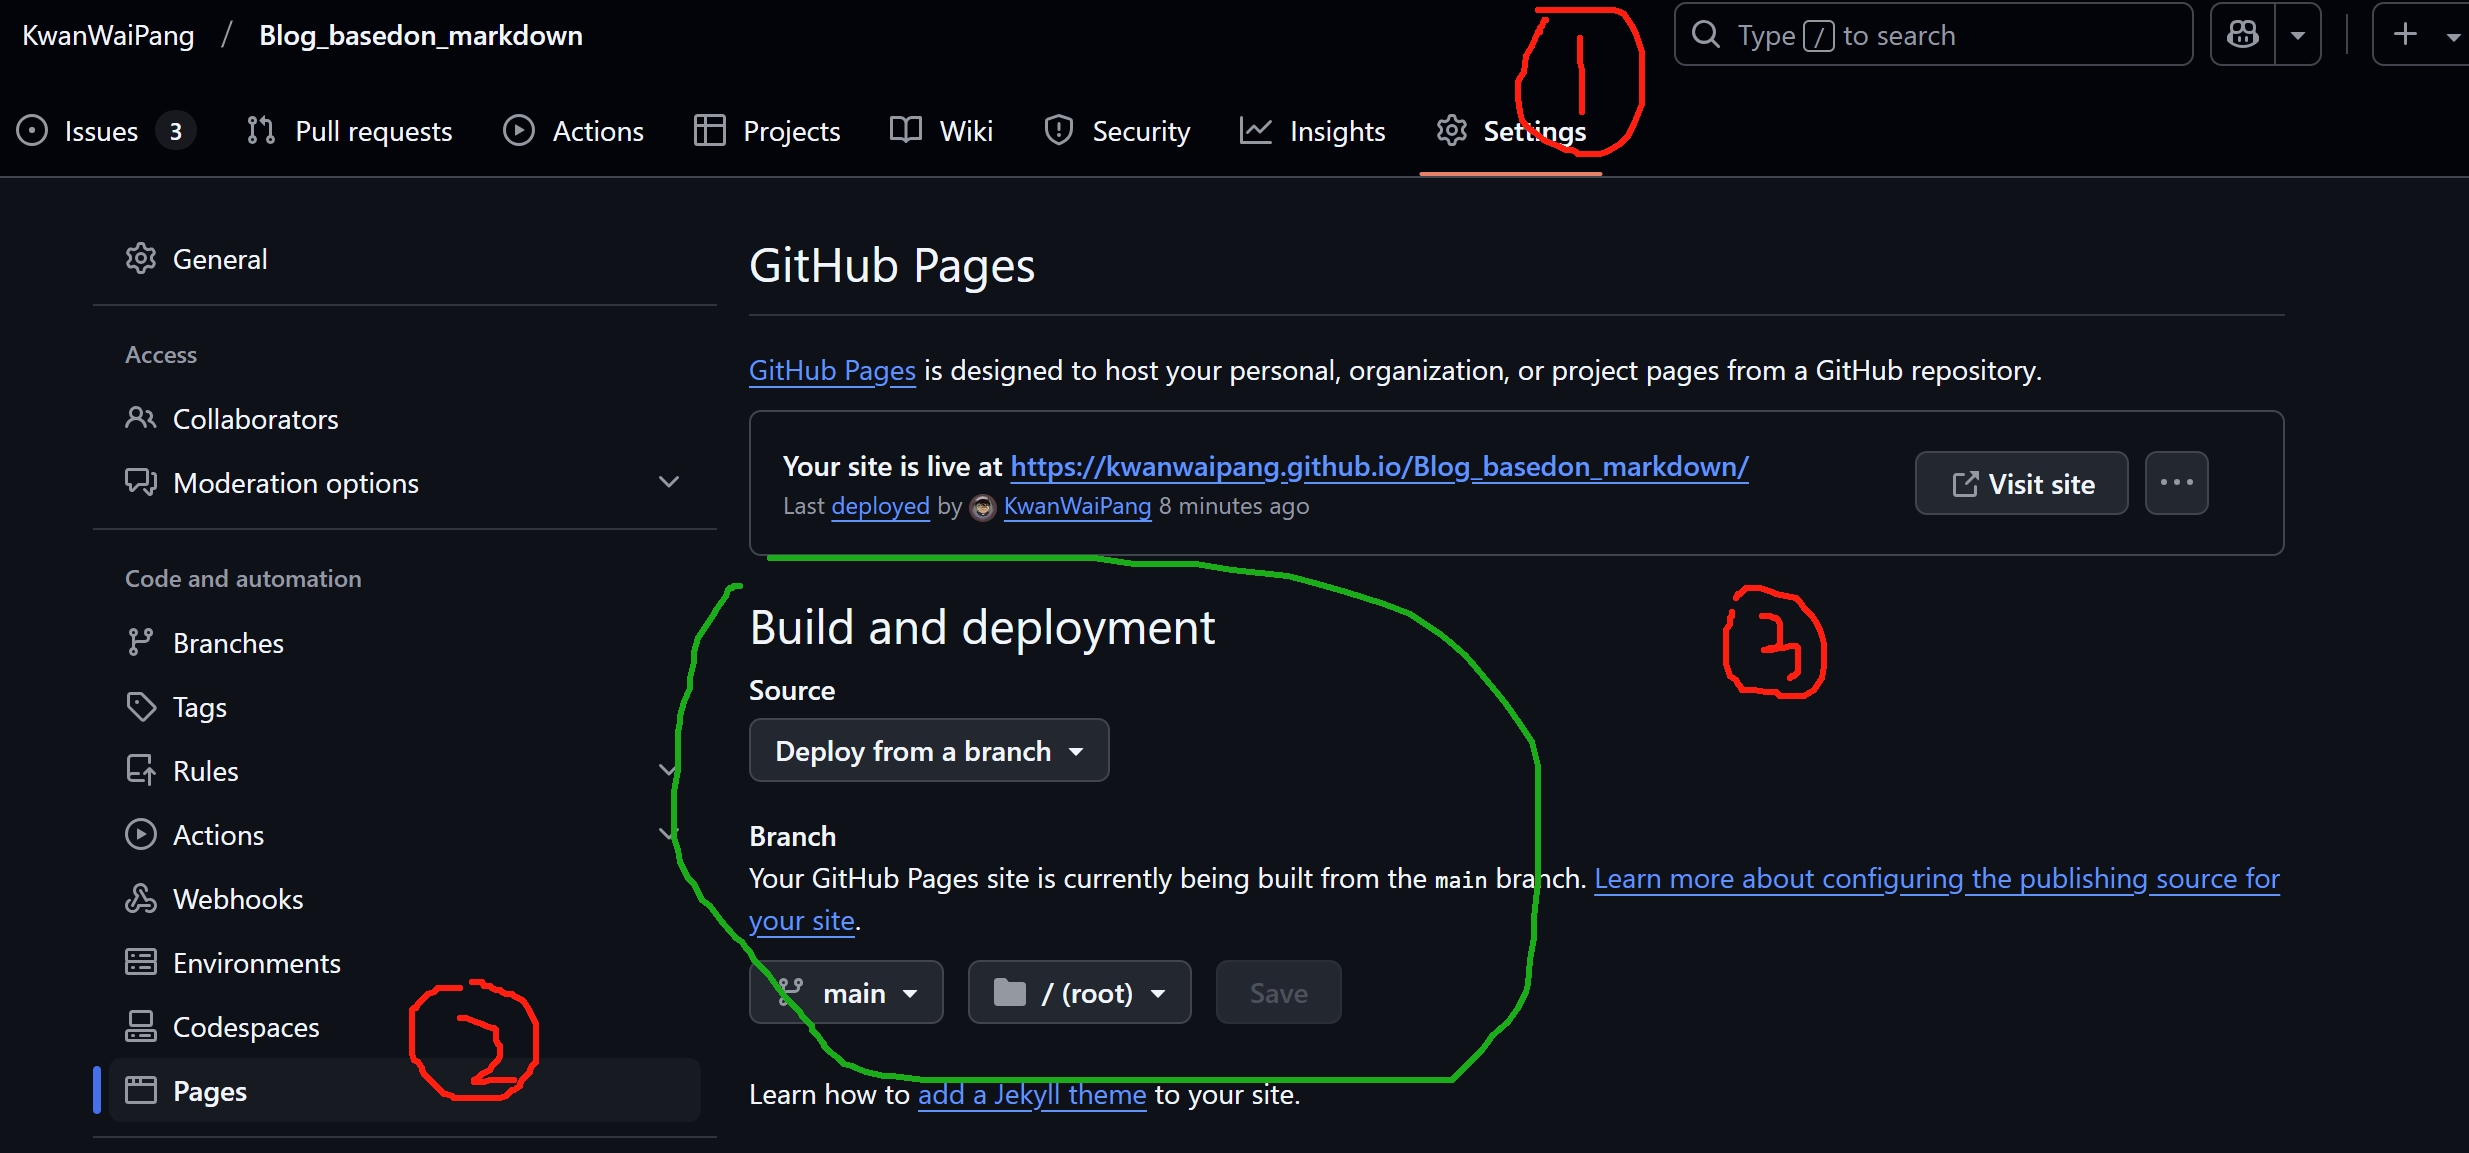
YOUR_repository_name仓库中 Github Pages配置如下:

- 所有博客的文章用markdown语法,写好统一放在_post文件夹下上传,git page会自动从你的git仓库拉去解析成网页,立刻就能在你的博客网页浏览。
- 关于文章的命名格式:博客文章必须按照统一的命名格式 yyyy-mm-dd-blogName.md
插入图片与动图

插入并列的两张图片:
 子标题1
子标题1
|
 子标题2
子标题2
|
插入github项目及star统计,同时点击实现跳转
插入视频
youtube视频
B站视频
不带loading-icon.gif:
带loading-icon.gif:
<div align="center" style="
  position: relative;
  width: 80%;
  height: 400px;
  margin: 0 auto;
  border-radius: 15px;
  background: url('https://kwanwaipang.github.io/File/Representative_works/loading-icon.gif') center/contain no-repeat;
  ">
  <iframe width="100%" height="100%"
    src="填入B站链接&autoplay=0"
    title="Bilibili video player" frameborder="0" allow="accelerometer; autoplay; clipboard-write; encrypted-media; gyroscope; picture-in-picture; web-share" referrerpolicy="strict-origin-when-cross-origin" allowfullscreen  style="opacity: 0; transition: opacity 0.5s; border-radius: 15px;" onload="this.style.opacity='1'"
  ></iframe>
</div>
自己的视频链接
插入代码块
hello world
This is some text in a paragraph.插入c++代码
int main() {
  int x = 6 + 6;
  cout << "Hello World! " << x << std::endl();
}
int main() {
  int x = 6 + 6;
  cout << "Hello World! " << x << std::endl();
}
插入python代码
print("Hello, World")
插入bash代码
# 注意:注释及部分字母是有区别的(注意要用bash而不是Bash)
rm -rf .git
git init
git add .
git commit -m "first commit"
git branch -M main
git remote add origin YOUR_github_repository_name
git push -u origin main
若单纯使用代码块:
# 注意:注释是有区别的
rm -rf .git
git init
git add .
git commit -m "first commit"
git branch -M main
git remote add origin YOUR_github_repository_name
git push -u origin main
避免Liquid转义
你可以用 {% raw %} 和 {% endraw %} 标签包裹代码。
markdown中的数学公式
- aB 或 $a^B$
- aB 或 $a_B$
- $\vec{a}$ 向量
- $\overline{a}$ 平均值
- $\widehat{a}$ (线性回归,直线方程) y尖
- $\widetilde{a}$ 颚化符号 等价无穷小
- $\dot{a}$ 一阶导数
- $\ddot{a}$ 二阶导数
- $\xi \in so(3)$
- $\mid$ 竖杆在markdown会引起格式出错,可以用
\mid代替
更多markdown符号Link
3D可视化插件
- 可视化三维模型.glb
- 对于下面的path_to_your.glb需要确保是可以在线下载的路径,输入浏览器检查一下即可
<!-- 定义全局样式 -->

<script type="module" src="https://unpkg.com/@google/model-viewer/dist/model-viewer.min.js"></script>

<model-viewer
  src="path_to_your.glb"
  alt="3D Model"
  ar
  auto-rotate
  camera-controls
  style="display: block; width: 100%; height: 500px; border-radius: 15px; box-shadow: 0 6px 12px rgba(0, 0, 0, 0.15); overflow: hidden;"
></model-viewer>
效果如下所示:
4D可视化插件
- 已经写好了4D插件了(基于Viser的),只需要把链接指定即可
YOUR_FILE_PATH.viser,至于&initDistanceScale=1&initHeightOffset=0.0则是对应视角的初始化参数,可以不改~
<div id="wrapper" style="
        display: flex;
        flex-wrap: wrap;
        justify-content: center;
        align-items: center;
        gap: 2em;
      ">
<iframe
      src="https://kwanwaipang.github.io/ubuntu_md_blog/4D_plugin/build/?playbackPath=YOUR_FILE_PATH.viser&initDistanceScale=1&initHeightOffset=0.0" style="
      border-radius: 0.5em;
      width: 80%;
      height: 400px;
      border: none;
      box-shadow: 0 0 1em 0 rgba(0, 0, 0, 0.15);
    "
      ></iframe>
</div>
- 效果如下:
google搜索引擎中登记网站
- 首先在google的搜索栏中输入下面的语句:
site:https://kwanwaipang.github.io/

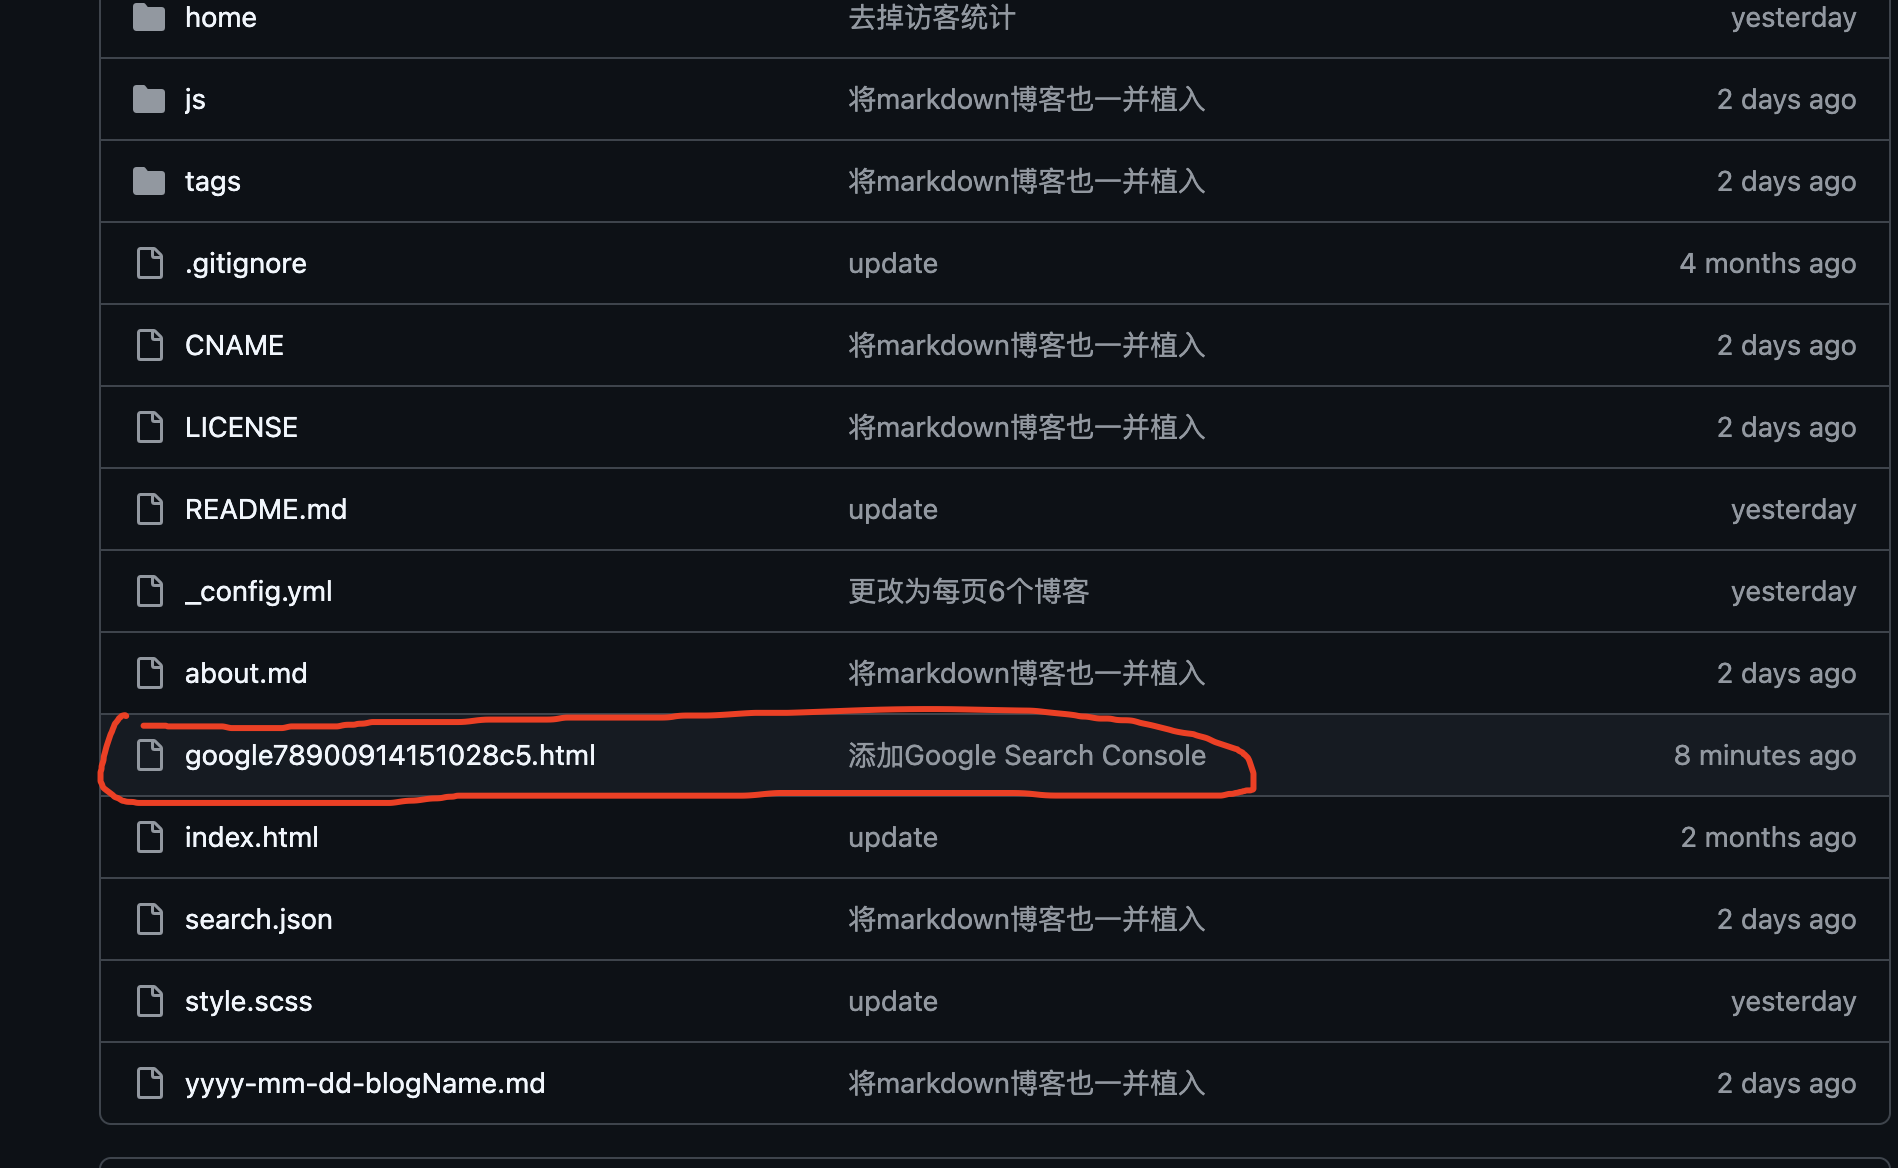
- Google网站站长Google Search Console然后添加资源,并按要求验证即可。下载对应的html文件,然后放在主目录下


- 接下来应该是通过添加站点,那么应该就让博客也可以被google搜到了


所谓的站点地图是一个 XML 文件,列出了你网站上的所有页面,帮助 Google 爬虫更快地发现和索引你的内容。应该为https://kwanwaipang.github.io/sitemap.xml
但似乎还是无法抓取~~~
对应的https://kwanwaipang.github.io/robots.txt应该也是正常的
- 此外也可以通过注册一个Google Analytics,可以统计你博客网站的访问人数,访问来源等非常丰富的网站数据。对应修改
_config.yml文件中的google_analytics即可 - 此博客采用了Google Analytics 4(GA4)而非旧版Universal Analytics(UA),详细请见代码
_includes\analytics.html
markdown转换器
- 飞书文档转markdown:Arya - 在线 Markdown 编辑器
可视化mermaid流程图
首先在_layouts\default.html中添加:每当页面检测到 Mermaid 代码块时,浏览器会自动将其渲染为流程图。
<script type="module">
  import mermaid from 'https://cdn.jsdelivr.net/npm/mermaid@10/dist/mermaid.esm.min.mjs';
  mermaid.initialize({
    startOnLoad: true,
    theme: 'default',
    securityLevel: 'loose'
  });
</script>
接下来使用下面代码:
<div class="mermaid" style="display: flex; justify-content: center; width: 90%; margin: 0 auto;">
graph TD
    %% 定义全局样式类:透明背景、黑边、黑字
    classDef plain fill:none,stroke:#000,stroke-width:2px,color:#000;

    A[数据输入 IMU/Image] --> B[main.py 初始化]
    B --> C[tracker.py 前端追踪]
    C --> D{是否为关键帧?}
    D -- 是 --> E[global_opt.py 后端优化]
    D -- 否 --> C
    E --> F[结果保存与可视化]
    C --> G[retrieval_database.py 重定位/回环]
    G --> C

    %% 将样式应用到所有节点
    class A,B,C,D,E,F,G plain;
</div>
- 效果如下图所示,也可将代码复制到在线的Mermaid编辑器中测试效果:
graph TD
%% 定义全局样式类:透明背景、黑边、黑字
classDef plain fill:none,stroke:#000,stroke-width:2px,color:#000;
A[数据输入 IMU/Image] --> B[main.py 初始化]
B --> C[tracker.py 前端追踪]
C --> D{是否为关键帧?}
D -- 是 --> E[global_opt.py 后端优化]
D -- 否 --> C
E --> F[结果保存与可视化]
C --> G[retrieval_database.py 重定位/回环]
G --> C
%% 将样式应用到所有节点
class A,B,C,D,E,F,G plain;
